

Daly BMS 传感器
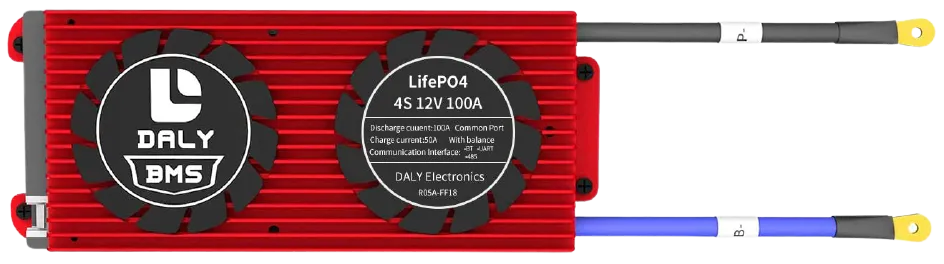
daly_bms 传感器平台允许您在 ESPHome 中使用 Daly Smart BMS
(更多信息)。
BMS 通过 UART 通信。
# Example configuration entrydaly_bms: update_interval: 20s- update_interval (可选, Time): 数据请求之间的延迟。
- address (可选, int): 要使用的地址,默认为
0x80。
读取 BMS 数据的传感器平台
sensor: - platform: daly_bms voltage: name: "Battery Voltage" current: name: "Battery Current" battery_level: name: "Battery Level" max_cell_voltage: name: "Max Cell Voltage" max_cell_voltage_number: name: "Max Cell Voltage Number" min_cell_voltage: name: "Min Cell Voltage" min_cell_voltage_number: name: "Min Cell Voltage Number" max_temperature: name: "Max Temperature" max_temperature_probe_number: name: "Max Temperature Probe Number" min_temperature: name: "Min Temperature" min_temperature_probe_number: name: "Min Temperature Probe Number" remaining_capacity: name: "Remaining Capacity" cells_number: name: "Cells Number" temperature_1: name: "Temperature 1" temperature_2: name: "Temperature 2" cell_1_voltage: name: "Cell 1 Voltage" cell_2_voltage: name: "Cell 2 Voltage" cell_3_voltage: name: "Cell 3 Voltage" cell_4_voltage: name: "Cell 4 Voltage"-
voltage (可选): 连接到 Daly BMS 的电池组电压。 来自 Sensor 的所有选项。
-
current (可选): 流过 BMS 的电流(电池输入或输出)。 来自 Sensor 的所有选项。
-
battery_level (可选): 电池电量(SoC),单位为 %。 来自 Sensor 的所有选项。
-
max_cell_voltage (可选): 电压较高的电池电芯。 来自 Sensor 的所有选项。
-
max_cell_voltage_number (可选): 电压较高的电池电芯的编号。 来自 Sensor 的所有选项。
-
min_cell_voltage (可选): 电压较低的电池电芯。 来自 Sensor 的所有选项。
-
min_cell_voltage_number (可选): 电压较低的电池电芯的编号。 来自 Sensor 的所有选项。
-
max_temperature (可选): 从温度传感器测得的较高温度。 来自 Sensor 的所有选项。
-
max_temperature_probe_number (可选): 测得较高温度的传感器编号。 来自 Sensor 的所有选项。
-
min_temperature (可选): 从温度传感器测得的较低温度。 来自 Sensor 的所有选项。
-
min_temperature_probe_number (可选): 测得较低温度的传感器编号。 来自 Sensor 的所有选项。
-
remaining_capacity (可选): 电池中剩余的容量(单位为 Ah)。 来自 Sensor 的所有选项。
-
cells_number (可选): 电池组中串联的电芯数量。 来自 Sensor 的所有选项。
-
temperature_1 (可选): 第一个温度传感器。 来自 Sensor 的所有选项。
-
temperature_2 (可选): 第二个温度传感器。 来自 Sensor 的所有选项。
-
cell_1_voltage (可选): 1 号电芯的电压。电芯编号可以从 1 到 16。 来自 Sensor 的所有选项。
指示 BMS 状态的文本传感器。
text_sensor: - platform: daly_bms status: name: "BMS Status"- status (可选): BMS 状态(充电、放电、静止)。 来自 Text Sensor 的所有选项。
指示 MOS 状态的二值传感器。
binary_sensor: - platform: daly_bms charging_mos_enabled: name: "Charging MOS" discharging_mos_enabled: name: "Discharging MOS"-
charging_mos_enabled (可选): BMS 充电 MOS 状态,用于启用电池充电。 来自 Binary Sensor 的所有选项。
-
discharging_mos_enabled (可选): BMS 放电 MOS 状态,用于启用负载。 来自 Binary Sensor 的所有选项。
控制 BMS
Section titled “控制 BMS”目前 Daly 传感器平台不支持控制您的 BMS,但您可以使用 uart.write 做一些事情。
首先您需要为充电和放电 MOS 设置二值传感器
binary_sensor: - platform: daly_bms charging_mos_enabled: name: "Daly Charging MOS" id: bin_daly_chg_mos internal: True discharging_mos_enabled: name: "Daly Discharging MOS" id: bin_daly_dischg_mos internal: True然后您可以添加开关
switch:  - platform: template    name: "Daly Charging MOS"    lambda: |-      if (id(bin_daly_chg_mos).state) {        return true;      } else {        return false;      }    turn_on_action:      - uart.write:          data: [0xA5, 0x40, 0xDA, 0x08, 0x01, 0x00, 0x00, 0x00, 0x00, 0x00, 0x00, 0x00, 0xC8]      - logger.log:          format: "Send cmd to Daly: Set charge MOS on"    turn_off_action:      - uart.write:          data: [0xA5, 0x40, 0xDA, 0x08, 0x00, 0x00, 0x00, 0x00, 0x00, 0x00, 0x00, 0x00, 0xC7]      - logger.log:          format: "Send cmd to Daly: Set charge MOS off"
  - platform: template    name: "Daly Discharging MOS"    lambda: |-      if (id(bin_daly_dischg_mos).state) {        return true;      } else {        return false;      }    turn_on_action:      - uart.write:          data: [0xA5, 0x40, 0xD9, 0x08, 0x01, 0.00, 0x00, 0x00, 0x00, 0x00, 0x00, 0x00, 0xC7]      - logger.log:          format: "Send cmd to Daly: Set discharge MOS on"    turn_off_action:      - uart.write:          data: [0xA5, 0x40, 0xD9, 0x08, 0x00, 0x00, 0x00, 0x00, 0x00, 0x00, 0x00, 0x00, 0xC6]      - logger.log:          format: "Send cmd to Daly: Set discharge MOS off"
您还可以添加选择器以更改电池电量
select: - platform: template name: "Daly Battery Level setup" optimistic: True options: - 100% - 75% - 50% - 25% - 0% initial_option: 100% set_action: then: - if: condition: lambda: 'return x == "100%";' then: - uart.write: data: [0xA5, 0x40, 0x21, 0x08, 0x00, 0x00, 0x00, 0x00, 0x00, 0x00, 0x03, 0xE8, 0xF9] - logger.log: format: "Send cmd to Daly: Set SOC to 100%" else: - if: condition: lambda: 'return x == "75%";' then: - uart.write: data: [0xA5, 0x40, 0x21, 0x08, 0x00, 0x00, 0x00, 0x00, 0x00, 0x00, 0x02, 0xEE, 0xFE] - logger.log: format: "Send cmd to Daly: Set SOC to 75%" else: - if: condition: lambda: 'return x == "50%";' then: - uart.write: data: [0xA5, 0x40, 0x21, 0x08, 0x00, 0x00, 0x00, 0x00, 0x00, 0x00, 0x01, 0xF4, 0x03] - logger.log: format: "Send cmd to Daly: Set SOC to 50%" else: - if: condition: lambda: 'return x == "25%";' then: - uart.write: data: [0xA5, 0x40, 0x21, 0x08, 0x00, 0x00, 0x00, 0x00, 0x00, 0x00, 0x00, 0xFA, 0x08] - logger.log: format: "Send cmd to Daly: Set SOC to 25%" else: - if: condition: lambda: 'return x == "0%";' then: - uart.write: data: [0xA5, 0x40, 0x21, 0x08, 0x00, 0x00, 0x00, 0x00, 0x00, 0x00, 0x00, 0x00, 0x0E] - logger.log: format: "Send cmd to Daly: Set SOC to 0%"UART 连接
Section titled “UART 连接”将 BMS 的 RX 连接到 ESP 板的 TX,将 BMS 的 TX 连接到 ESP 板的 RX。
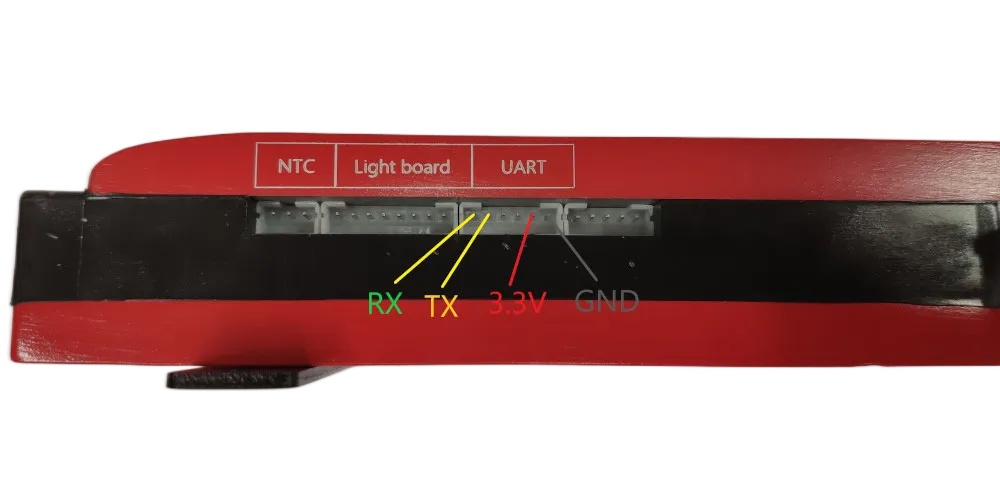
3.3v 警告: 某些 BMS 的 3.3v 无法输出大电流,可能无法正确为 ESP 供电。如果您遇到 WIFI 连接问题或类似问题,请尝试不同的电源。Daly 连接器上提供 12-15v,通过适当的降压转换器可以正确为 ESP 供电。
在 ESP32 上(ESP8266 未测试)如果遇到数据缺失(如 Temperature 1/2),可能是由于 UART 缓冲区大小。 在您的配置中添加以下内容以将缓冲区从默认的 256 增加到 512。
uart: ... rx_buffer_size: 512