

0.115:生日版发布!媒体浏览器、标签、自动化与大量 WTH 改进
Home Assistant 生日快乐!
There's a party goin' on right here 🕺
A dedication to last throughout the years 🥳
So bring your good times, and your laughter too 😂
We gonna celebrate our party with you 🎁
It's a celebration! 🎉
~ Kool & The Gang - Celebration
7! Siete! Soch! Syv! Sieben! Seitsemän! Cедем! Sept! Sju! επτά! Zeven! Sette! Seven! Years old today! And ooooh, are we going to party and celebrate with you!
你可能已经注意到了,这次发布稍微晚了一点,整整晚了两周。我们平常的发布周期是 3 周,而这次用了 5 周。当然,这和今天的生日有关,不过还有什么礼物能比一个装满内容、人人都能从中找到惊喜的版本更好呢?
幸运的是,很多人在“What the heck?!” 之月(WTH)中分享了自己的心愿清单。太喜欢你们了!这个月论坛里出现了大量精彩的想法、痛点和建议,真的太棒了!
而且不仅如此,还有很多人亲自下场把这些问题修好。多么棒的社区!WTH 月马上就要结束了,之后我们会先关闭论坛中的这个分类,直到下一个 WTH 月再重新开放。
除此之外,这次发布还带来了两个全新而重磅的功能,我们非常希望在发布前把它们打磨到更完善。
我平时通常会在这里写几句我个人对这个版本的开场白, 但老实说,这次我完全不知道该从哪儿写起……内容实在太多了! 我真的很喜欢这次新增的自动化功能,但这个版本里这种内容也太多太多了。😅 我决定放弃尝试把它们都写出来了。😂
所以,就让我用一段对我们创始人的感谢来收尾吧:
Paulus, thank you so much for what you have imagined, started and 创建 7 years ago. Your idea has changed the lives of many, including my own. Thank you.
当然,不只是 Paulus,而是所有以任何方式为这个项目做出贡献的人。 无论是代码、文字、支持、聊天、YouTube 视频、直播、博客、文章、社区指南、文档、推文、issue、bug 报告、功能请求、想法、提问,哪怕只是单纯在使用它的人。 感谢你们的贡献!❤️
生日快乐,也祝你享受这个版本!
../Frenck
目录
好啦,这次发布内容非常庞大,所以这里放上一份目录,方便你快速浏览整篇发布说明。
- Happy Birthday Home Assistant!
- Table of contents
- Media Browser
- Home Assistant Tags
- Customize the 侧边栏
- Person image upload
- Updated more info dialog
- More information in the logbook 面板
- automation & 脚本 updates
- Calendar 卡片
- Template 开发者工具
- 重载 everything YAML
- User password change
- Improved ways of exposing entities via Home Assistant Cloud
- Add 卡片 by entities
- Order entities in Lovelace UI editor
- Other noteworthy changes
- New integrations
- New Platforms
- integrations now available to set up from the UI
- If you need help...
- Backward-incompatible changes
- Farewell to the following
- 发布 0.115.1 - September 18
- 发布 0.115.2 - September 19
- 发布 0.115.3 - September 25
- 发布 0.115.4 - September 28
- 发布 0.115.5 - September 29
- 发布 0.115.6 - September 30
- All changes
媒体浏览器
这个版本带来了一组非常令人兴奋的媒体相关功能。如果你的媒体播放器支持它,你现在可以直接浏览播放器的媒体库,并快速切换正在播放的内容。想调灯光又想选音乐时,再也不用在两个应用之间来回切换了。
任何媒体播放器都可以启用这个新功能。本次发布已经为 Arcam FMJ、Kodi、Philips JS、Plex、Roku、Sonos 和 Spotify 加入了媒体浏览器支持!
感谢 @jjlawren 完成最初实现,也感谢 @cgtobi、@ctalkington、@martinhjelmare、@elupus 为各个集成和后端细节所做的完善工作。
不过媒体浏览器不只是后端功能,它还得足够好看。幸运的是, @zsarnett 在 @bramkragten 的帮助下完成了漂亮的设计,让你能更优雅地浏览自己的媒体内容。
When @hunterjm saw the new media browser, he got an idea. What if the 用户 can use the media browser to browse media offered by any 集成 and play it on any of their media players? And so the media source integrations was born.
The first media source that has been added is to allow 用户 to play local media. Local media can be motion detection events from your IP 摄像头 or a bunch of music files to be used with Home Assistant Tags.
Home Assistant, by default, will look at the /media path. If you're using Home
Assistant OS (the default 安装), you can use the Samba 插件 to upload media.
If you use Docker, you need to mount a volume at /media and if you use a
Python virtual environment, the default is <config>/media.
You can also specify your own media paths with a new 配置 option
in configuration.yaml:
Media Source is not limited to local media. Any 集成 can offer its media. @cgtobi has upgraded the Netatmo integrations, which will now offer its recorded motion events to play.
Media player 集成 that want to play media sources will need to be updated. In this 发布, we've updated the Chromecast integrations. If you click its media browser 按钮, you will be presented with the available local sources.
Sometimes you just want to play your media without having to 打开 the TV. To 遮盖 that case, @zsarnett added a new media browser to the Home Assistant interface, which can be used to play your media. That way, you can quickly see what that motion event that you just received was about.
Home Assistant 标签
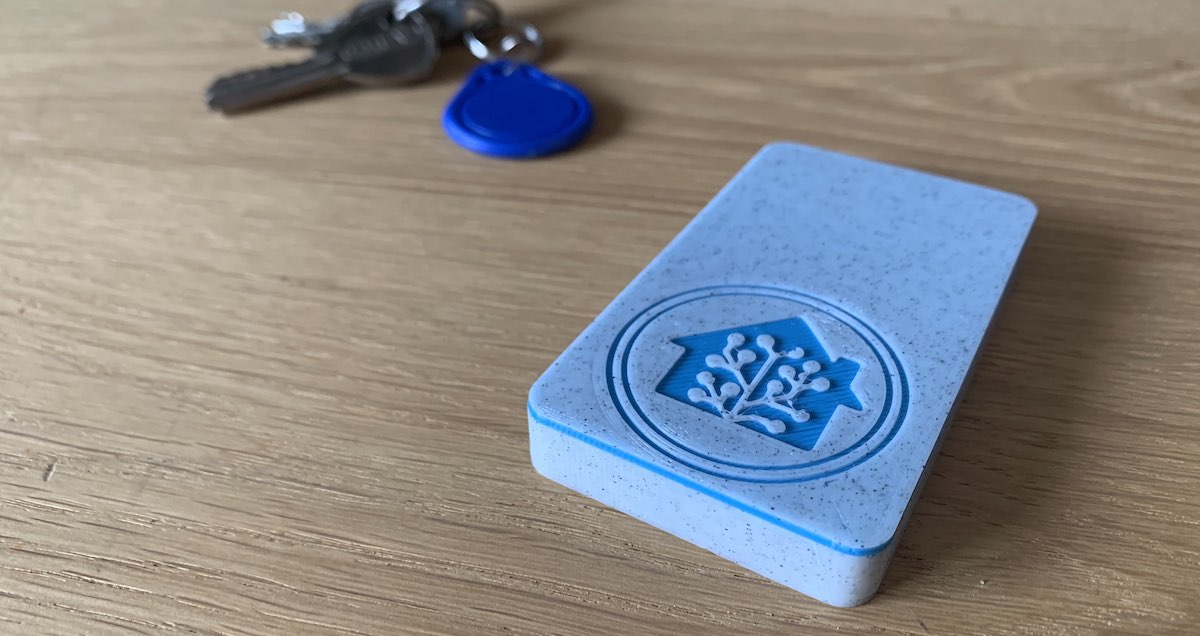 The Home Assistant tag reader, made by Adonno with the help of MagnusO.
Home Assistant 现在已经原生支持标签了!借助 Home Assistant 标签,我们让可扫描标签(NFC/RFID)正式成为 Home Assistant 中的一等公民。读取、写入和自动化都变得更简单!
We have a beautiful UI for it in the 前端, our mobile companion apps have been updated to work seamlessly with tags and there is now even an open-source scanner available, as shown in the 图像 above.
For all details, read the dedicated 博客 post about Home Assistant tags!
自定义侧边栏
One of the most requested functions of What the heck was customizing the 侧边栏: You do want history for your 实体 in the more info dialog, but you don't use that history 面板. Or you do want 日历 for automating, or in the new Lovelace 卡片, but don't want a 日历 面板 with all your 日历.
Now you can hide 面板 from the 侧边栏 and rearrange them, by just drag and drop them.
 Screen recording of customizing the 侧边栏.
You can enter edit mode by pressing and holding the 侧边栏's header or from
your profile page. You can then drag the items in the order you want them
or remove them by clicking the x next to it.
The removed items will be visible at the bottom of the list, by clicking the
+ 按钮, you can add them back to the 侧边栏.
These 设置 are stored on your 设备 in the local storage of your browser, this means that this setting is 设备-based and will be cleared when you logout.
人员图片上传
You can now upload 图像 for a person in the 前端!
Select or drop an 图像 in the input field and then crop it to a square. The 图像 is stored on your Home Assistant instance.
We will use the 图像 in the 前端 for your persons and the 侧边栏 for the 用户 linked to this person.
This feature is powered by the new 图像 集成 and opens up for future possibilities. For example, uploading 图像, for use in your Lovelace picture 卡片, would be nice!
更新后的更多信息对话框
The more info dialog is updated. In case an 实体 has controls, for example a 灯光, the more info dialog will now have 2 tabs. One for controls and one for history.
On the history tab, you can find the history graph you are used to and now also a list of logbook entries of the specific 实体.
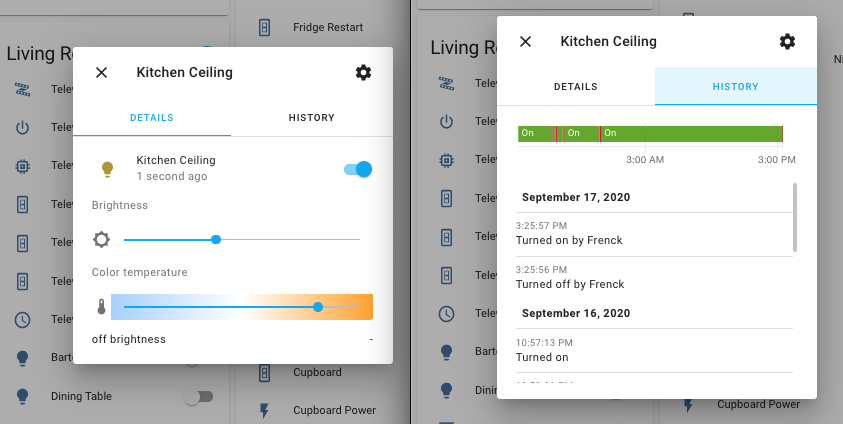 The updated more info dialogs, showing the two tabs: details & history.
For 实体 without controls (like a 传感器), no tabs will be shown like before.
日志簿面板中的更多信息
The logbook will now show what 自动化 or 脚本 caused the change and what 动作 was used to make the change happen.
This solves yet another WTH request. It will be really helpful to find those cases that are: WTH turned on this 灯光?
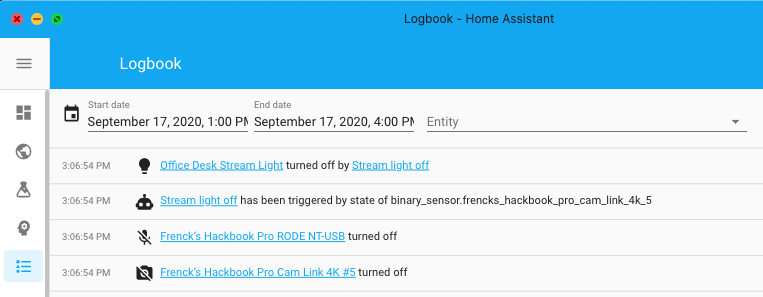 The logbook shows which 自动化 changed the 状态 of my stream 灯光.
自动化和脚本更新
The month of "What the heck?!" brought in a lot of topics that evolve around 自动化 and 脚本, of which quite a few have been addressed this 发布. Furthermore, we already had quite a bunch of improvements pending. If you like doing 自动化 in YAML, you'll probably just love this 发布.
Before starting on the list of newly added features, let's talk about the Home Assistant 前端. You can now duplicate an 自动化 and, the long present but always disabled, duplicate 条件, 触发器, and 动作 function are now also finally working!
新动作:等待触发器
This is a special new 动作 than can be used in an 自动化 动作 or 脚本 sequence that allows you to pause the execution until a certain 触发器 is been fired. It can be helpful for 自动化 or 脚本 that consist of multiple stages.
In this example, a 通知 is sent when one passes through two gates to enter the garden, but only when both gates are passed within 10 seconds.
This example is simple and probably fairly useless for most of us. However, let's say you left your garage door open and you leave the "Home" 区域. Home Assistant could send you an actionable 通知, saying: "Hey, you left the garage door open, shall I close if for you?" with 2 choices: Yes/No.
Where you previously would have needed 3 自动化 for this. The first
for sending a 通知 and two others for handling the "Yes" or "No"
answer. Using the wait_for_trigger this could be done in a single 自动化.
Right after sending the 通知, the wait_for_trigger could halt the
脚本 from continuing, until it receives the "Yes" or "No" answer and continue
after that and run the 动作 you'd like based on the answer received.
This new feature is not just for our YAML uses; it also is added to our 自动化 editor in the UI.
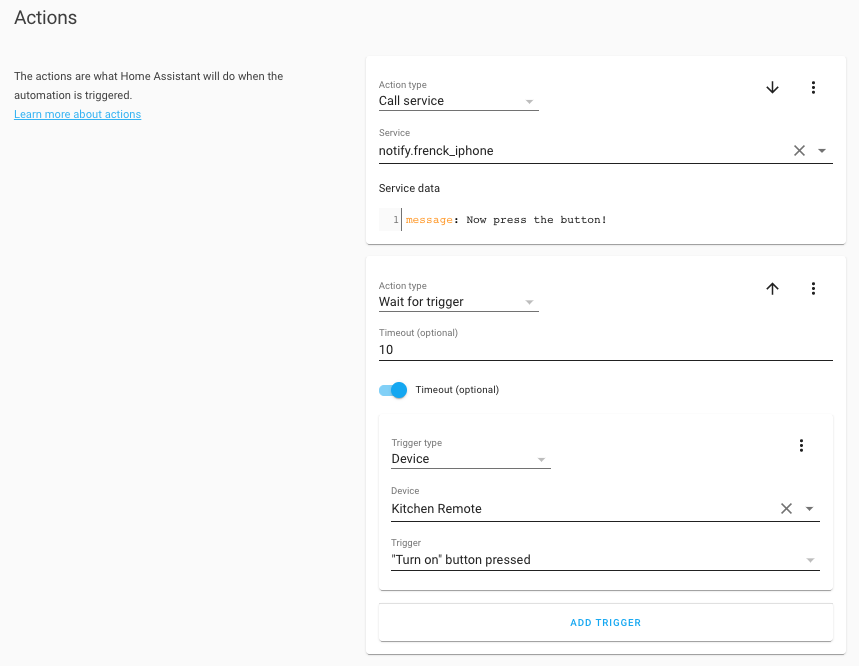 The 自动化 editor can also use the new Wait for 触发器 动作.
基于实体属性的触发器与条件
Ever tried to create an 自动化 触发器 or 条件 on an 实体 属性, like the temperature of a 温控 or 天气 实体?
You used to need to use a 模板 for that. Either by extracting the 属性 from an 实体 using a 模板 传感器 or by writing a 模板 条件. A reason for a lot of you to put it up as a "What the heck?!" entry. And you know what? You guys are right, this was difficult.
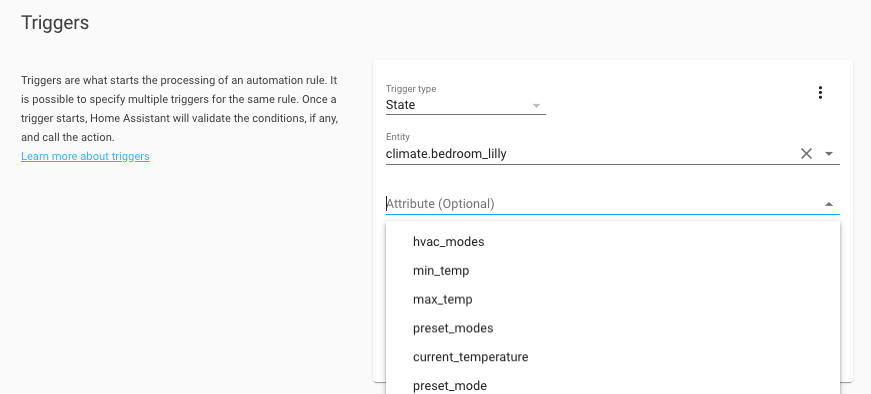 The 自动化 editor now supports 属性 on 触发器 and 条件.
So, Home Assistant now supports the use of 属性 in 触发器 & 条件.
Both the 状态 and numeric 状态, 触发器 & 条件 now have an attribute
option that can be set with the 属性 to use. The UI got a nice field for
it, as shown in the above screenshots, but of course, it is also available
when you are using YAML for your 自动化.
Some example 触发器 and 条件 using 属性 in YAML:
在自动化触发器中使用 input_datetime 助手
Using dates and times in your 自动化 can be hard. If often needs quite a bit
of Jinja templating and is actually really hard to do. @pnbruckner noticed,
and he added the possibility to use your input_datetime 助手 实体
directly in time 触发器!
Assume you have an input_datetime.bedroom_alarm_clock_time 助手 实体, that
is in your Lovelace UI, which you can set a time in. Great! You can now
just use it in your 自动化 to 触发器 on:
Yes, he made it that elegant. It also works for multiple, or mixed variable and statically set times.
More about the time 触发器, can be found in our 文档.
在条件中使用 input_* 助手
@pnbruckner set a standard in the above, and we used that to start working
on making this something that would work on more places. As of this 发布,
all input_* 实体 can be used in 条件.
The time 条件 can accept input_datetime 助手 实体, similar to
the 触发器 shown above.
The numeric_state 条件 now accepts input_number 助手 实体 for
the above and below options.
And finally, the state 条件 accepts any input_* 助手 实体 in its
state option.
We are confident this will greatly improve the power and ease of the 助手 实体. The 条件 文档 has been updated with more examples.
Here is an idea: You can now easily create a set of 助手 实体 representing your 自动化 设置 and adding those to a separate Lovelace 仪表盘. You now have your own 自动化 配置 面板, helpful for tweaking things like times or adjust temperature thresholds, without touching your 自动化.
模板条件简写
A neat little trick added this 发布: Allow for shorter, cleaner YAML code, if you use 模板 quite a bit: A shorthand notation for 条件 模板 have been added.
All places that accept 条件, now accept 模板 directly. Some examples:
Or in a list of 条件:
More examples can be found in the 条件 文档.
直接在 data 和 service 字段中使用模板
More WTH input! Those data_template, and service_template fields in 服务
calls are so annoying! Why not accept 模板 in the normal data and service
field?
Good question! And even better suggestion. As of now, you can!
Don't worry, the old format still works as before, so this is not a breaking
change. However, you can start removing those data_template's by renaming to
(or merging them with) data.
The keys inside a data block, can be 模板 now too!
变量
Another WTH item, "Why can't we have variables?!". This WTH is not fully solved, but a good start is made this 发布 by adding support for variables to 自动化 and 脚本.
Here is an example 自动化:
While the above example, it doesn't add that much value, it does shows how it works. Variables can be 模板 too! For example:
Both 脚本 and 自动化 动作 support this syntax now. Additionally, we added a new 动作! The variables 动作. This unlocks the potential to change variables during the runtime of a 脚本.
For a more extensive example, check out the example written in the 博客 article about Home Assistant Tags.
其他脚本和自动化变化
But wait! There is more! 😂
There was no way of knowing if a wait 模板 was timed out or if it continued
normally. Now, we do know this. After each wait 模板, a new variable is
available: wait. It provides wait.completed (indicates if the 模板
evaluated to true before the timeout expired) and wait.remaning (remaining time
out).
The new 脚本 and 自动化 run modes are amazing! But in some cases, they
might be polluting your 日志. For example, you have a 自动化 in single
mode, but it does get triggered multiples times sometimes and you are not
interested in the 日志. You can now control that with the max_exceeded option.
The example below silences the 自动化 and it will not 日志 when it gets triggered while it was already running:
日历卡片
Like promised, when we introduced the 日历 面板, we now also added a Lovelace 日历 卡片!
This allows you to create as many 日历 as you want with the 实体 you want.
If you want multiple 日历 面板, create a Lovelace 仪表盘 with a panelmode view with a 日历 卡片!
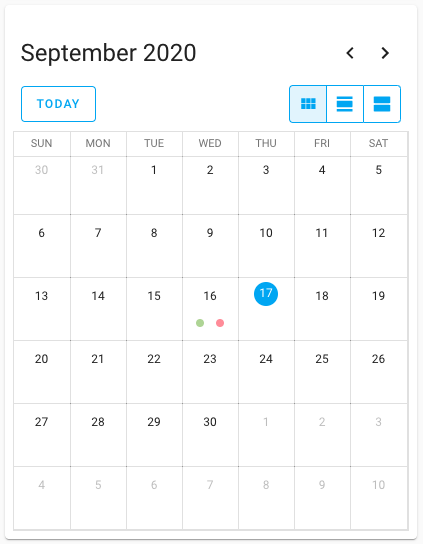 Screenshot of the new 日历 卡片.
模板开发者工具
The 模板 开发者工具 are very useful for checking if the 模板 you made works and does what you want it to do. But people had some annoyances with the tool; the editor is always filled with sample data, that can give a lot of response. It would be more useful to have your previously used 模板 there. Yes, you guessed it, another WTH!
The 模板 would also not automatically re-render after the 状态 of an 实体 is changed, causing you needing to change the 模板 in order to re-render it.
We addressed both these issues. We save your last-used 模板 and will show that instead of the example when you visit the 模板 开发者工具.
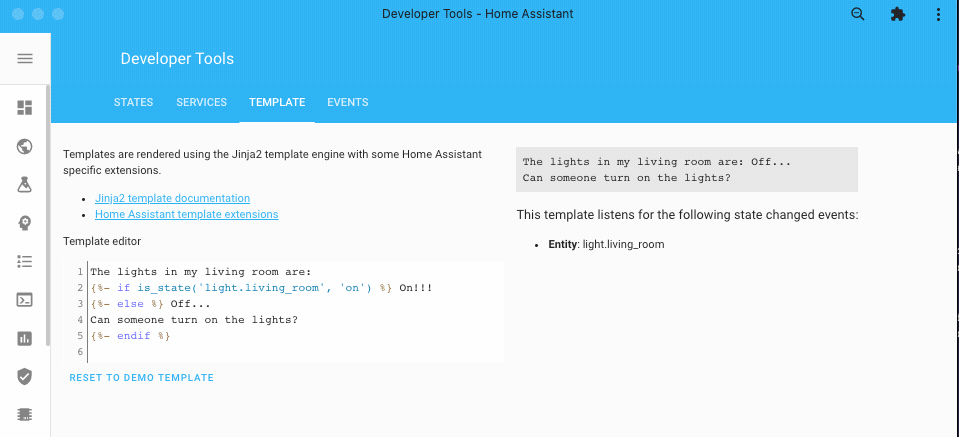 模板 you write in the 开发者工具, are now updating live!
We will also listen for changes of the 实体 you used in your 模板 and automatically re-render your 模板. As a bonus, we will show which 实体 Home Assistant detected you are using in your 模板.
重载所有 YAML 配置
WTH, do we still need to 重启 Home Assistant for applying YAML 配置? That was one of the WTH raised. It is being worked on!
This 发布, @bdraco found a way to 重载 some of the internal 集成 and boosted this capability to a lot of 集成. For those, you can just 重载 the YAML in the 配置 server control page (you will need advanced mode).
As of this 发布, besides the 集成 that already could be reloaded, the following 集成 can now 重载 their YAML 配置 without a 重启 of Home Assistant:
- Command Line
- File Size
- Filter
- Generic IP 摄像头
- Generic Thermostat
- Groups
- History Stats
- HomeKit
- Min/Max
- MQTT
- Ping
- RESTful
- 树莓派 GPIO
- SMTP
- Statistics
- Telegram
- 模板
- Trend
- Universal Media Player
You can also 重载 an 集成 that is 设置 with the UI! This can be useful when it lost its connection or is in an otherwise failed 状态. You can find the 重载 按钮 in the overflow menu on the 集成 卡片.
 UI configured 集成 can now be reloaded as well!
更改用户密码
Another What the heck, that sounded so obvious: Being able to change a 用户's 密码 as the owner of the system. Right?!
You can now change every 用户's 密码 from the UI when you are the owner of the system!
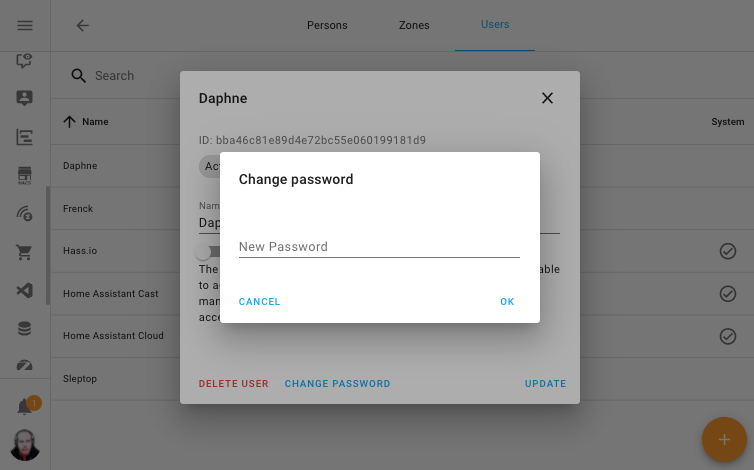 As a owner, you can now change a 密码 of a 用户.
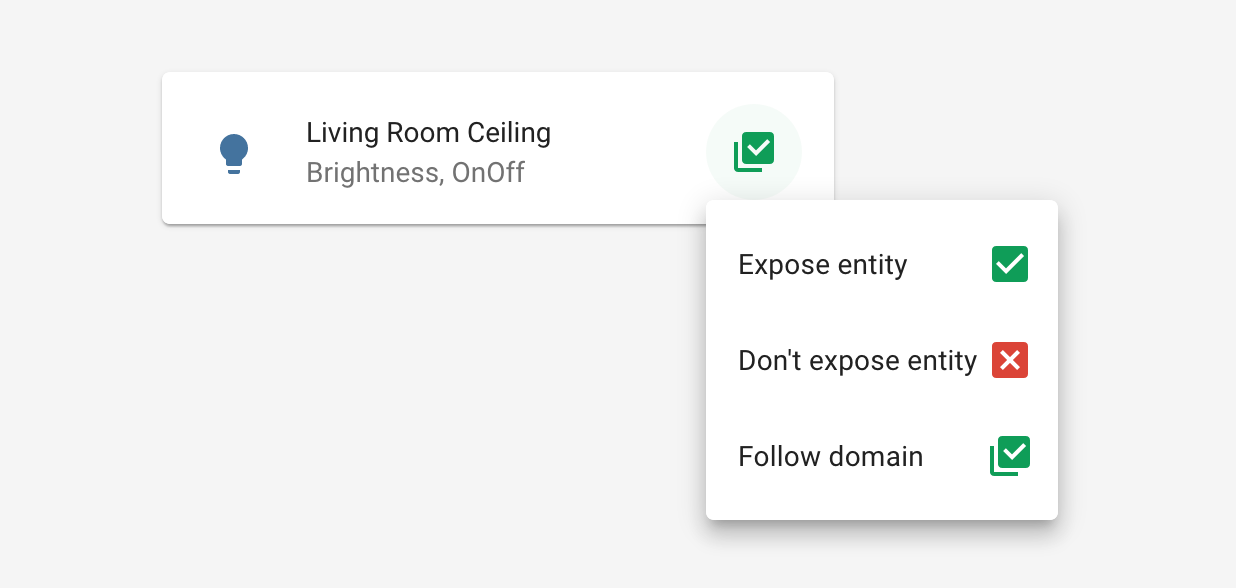
通过 Home Assistant Cloud 暴露实体的改进方式
This 发布 brings an 更新 to the way you can expose 实体 to Google Assistant and Amazon Alexa via Home Assistant Cloud.
With the new 面板, you can now set on a domain level if 实体 should be exposed/not exposed by default. You can still override this on a per-实体 level for fine-grained control.
The default expose rules have also been updated to expose 实体 that work best with voice assistants.
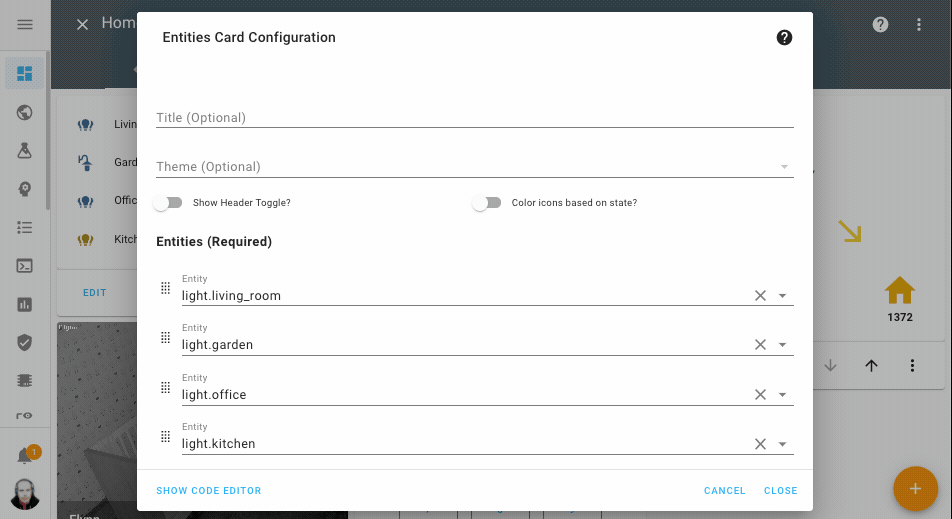
按实体添加卡片
Are you a bit overwhelmed by all the different types of 卡片 Lovelace has? You can now just select the 实体 you want to use for a 卡片, and have Lovelace suggest a 卡片 for you.
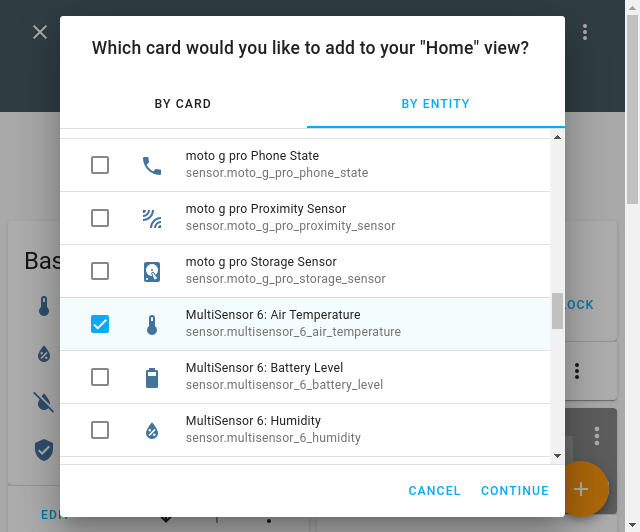 Select one or more 实体 to populate the 卡片.
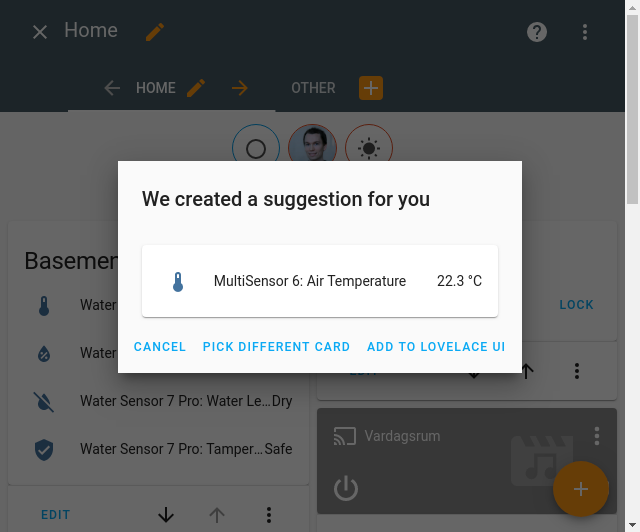 A confirmation dialog is shown before adding the suggested 卡片.
In the add 卡片 dialog, we added a second tab with a list of all your 实体. Select the 实体 you want to use and click continue. We will suggest a 卡片 for you and you can then fine-tune the 配置.
在 Lovelace UI 编辑器中排序实体
You can now sort the 实体 in Lovelace UI editors by just dragging them. No more clicking the up and down 按钮 over and over again, simply drag the item up or down.
 Drag and and drop the 实体 in the order you want.
其他值得注意的变化
-
The OpenZWave beta 集成 is coming along nicely. First signs of some control 面板 in the UI are visible this 发布. You can see the status and information of your network and nodes. There are also 按钮 to put your Z-Wave network in inclusion and exclusion mode and to refresh a node. Thanks @cgarwood!
-
The code editor in the UI is now theme-able, so make them look nice!
-
The stream component now supports audio! Amazing job @uvjustin!
-
Slack 通知 now supports change username/icon on the fly, which was a great WTH suggestion! Thanks for adding that @bachya.
-
The Met.no now supports hourly forecasts, very nice @bruxy70!
-
The MDI icons are updated to 版本 5.5.55, this adds another 100 icons you can use!
-
The Google Assistant 集成 got some updates:
- @elupus added support for asking for the previous or next input source.
- Basic support for controlling 灯光 effect has been added by @mjg59.
- @blueshiftlabs added capabilities to control media player muting and relative-volume controls.
-
The Netatmo 集成 was re-engineered, which reduced the number of API calls and added Webhook events to improve overall responsiveness. It now supports controlling the outdoor 摄像头 floodlight and got 服务 to set the occupants' home/away status and the outdoor 摄像头 mode.
-
We no longer automatically alphabetically sort the keys in YAML files written by the UI, as a result from a WTH request. Much better!
新集成
A lot new 集成 added this 发布:
- Emulated Kasa, added by @kbickar
- Flo by Moen, added by @dmulcahey
- 图像, added by @balloob
- Media Source, added by @balloob
- Nightscout, added by @marciogranzotto
- ProgettiHWSW, added by @ArdaSeremet
- Risco 报警, added by @OnFreund
- RoonLabs Media Player, added by @pavoni
- Shark IQ, added by @ajmarks
- Shelly, added by @balloob
- Smart Meter Texas, added by @grahamwetzler
- Tag, added by @dmulcahey
- UK Environment Agency Flood Monitoring, added by @Jc2k
- WiLight, added by @leofig-rj
新平台
The following 集成 got support for a new platform:
- Agent DVR now supports the 报警 Control 面板, added by @ispysoftware
- devolo Home Control now support blinds and thermostats, added by @2Fake
- Fibaro added basic 门锁 support, added by @pbalogh77
- KNX now supports the use of a dedicated 天气 station, added by @marvin-w
- VeSync added support for 风扇, added by @TheGardenMonkey
现在可通过 UI 设置的集成
The following 集成 are now available via the Home Assistant UI:
- Broadlink, done by @felipediel
- Insteon, done by @teharris1
- Kodi, done by @OnFreund
- OpenWeatherMap, done by @freekode
- Yeelight, done by @shenxn
如果你需要帮助……
...don't hesitate to use our very active forums or join us for a little chat.
Experiencing issues introduced by this 发布? Please report them in our issue tracker. Make sure to fill in all fields of the issue 模板.
不向后兼容的变更
Below is a listing of the breaking change for this 发布, per subject or 集成. Click on one of those to read more about the breaking change for that specific item.
自动化
Previously an 自动化's last_triggered 属性 was updated, and an
automation_triggered event was fired, whenever a 触发器 fired and the
条件 (if any) were true, regardless if the 动作 actually ran.
For example, in single mode, the 动作 won't run if they are still running
from a previous 触发器 event.
Now the 属性 will be updated, and the event fired, only if the 动作 actually run.
(@pnbruckner - #39323) (自动化 docs)
Axis
Initial naming of events from VMD4 and Fence guard are now based on their
configured name on the 设备; binary_sensor.m1065-lw_0_vmd4_camera1profile1
is now binary_sensor.m1065-lw_0_vmd4_profile_1 or profile_1 can be whatever
the 用户 chose to name the profile.
Broadlink
1. 设备 are now configured via 配置 flow
To set up a Broadlink 设备, click Configuration in the 侧边栏 and click Integrations.
The 设备 will be imported from your 配置 files to that page. If you see
your 设备 there, click Configure. If not, click the + icon in the lower
right, click Broadlink, enter the host and follow the instructions to
complete the 设置.
The name you choose will serve as a 模板 for the 实体. You can change the 实体 name and id in the 实体 设置 on the 前端. You may need to change some names or ids to make everything look the same as it was before this 更新.
2. Discontinue broadlink.learn and broadlink.send 服务
remote.learn_command and remote.send_command are now registered
automatically. Now you can use remote.send_command to send base64 codes.
Instead of broadlink.learn:
Use the remote.learn_command:
Instead of broadlink.send:
Use the remote.send_command by replacing host by entity_id of the 遥控器 实体, replace packet by command with data prefixed with b64::
If you have learned the commands, you can refer to them by name instead of the raw codes.:
3. Discontinue all platforms, except 开关
实体 are now registered automatically. The only exception is the 开关 platform, which continues to exist for RM 开关. The config schema haschanged . The host and type are no longer required and the name serves as a 模板 for the 实体 ID.
Instead of:
Use this:
The above example creates switch.sony_tv and switch.lg_tv to be controlled
using the 设备 with the MAC address 34:ea:34:b4:5d:2c. This 设备 needs to
be configured first via 配置 flow.
When you finish configuring the 设备 you can delete all your Broadlink 配置 files except the RM 开关. These 开关 are the only platform that still exists in YAML. They won't be imported. If you delete the file, they are gone.
(@felipediel - #36914) (broadlink docs)
Brother 打印机
The uptime 传感器 状态 format and unit have been changed. If you rely on those you might need to adjust your 配置.
(@bieniu - #39226) (brother docs)
CPU 速度
The naming of the 属性 was updated to be aligned with the current used standards.
Brand->brandGHz Advertised->ghz_advertised
(@fabaff - #39155) (cpuspeed docs)
Deutsche Wetter Dienst (DWD) 天气 警告
If you use 实体 状态 属性 of 此integrations in 自动化 or 脚本 need to adjust these to handle the changes.
- The
region_state属性 has been removed, cause it is no longer available on the new API. - All timestamps in the 状态 属性 are now UTC and not local time anymore.
Emulated Hue
By default, all 灯光 and 设备 that do not support brightness adjustment are exported as On/Off 灯光 without a brightness property. When upgrading from earlier versions of Home Assistant (0.112 and earlier), some 设备 may now be reported by Alexa as non-responsive.
Alternatively, you can set the lights_all_dimmable 配置 option to
continue reporting these 设备 as if they have a brightness setting.
How to fix it once and for all:
You need to have Alexa rediscover all 设备 and then remove the now non-responding duplicates using the Alexa phone App. This can take quite a while if you have lots of 设备.
An alternative would be to 日志 in to the Alexa web site and remove all the 灯光 instead and then re-discover them all.
To do so go to https://alexa.amazon.com/spa/index.html#appliances, or if not logged in: https://alexa.amazon.com then select "Smart Home" -> "设备" and select "Remove All".
If you have multiple Echo 设备 on your network, it is possible that the entries would continue to show as duplicates. This is due to an individual Echo 设备 caching the old list and re-using it.
The only known solution for this is to remove your echo 设备 from your Amazon account, delete all the 灯光 previously discovered by Alexa and then re-run discovery.
This is a one-off requirement, unfortunately there's no other way to easily transition from the previously incorrect values reported by the Emulated Hue.
Ezviz
The Ezviz 集成 has been temporarily disabled, as it has a dependency that contains code that breaks Home Assistant.
(@balloob - #38444) (ezviz docs)
前端
The previous deprecated 前端 配置 options frontend_extra_html_url
and frontend_extra_html_url are now removed.
HDMI-CEC
The HDMI-CEC 集成 has been temporarily disabled, as it has a dependency that contains code that breaks Home Assistant.
旧版 Android 设备上的 Home Assistant Cloud
Home Assistant Cloud uses Let's Encrypt to provide SSL certificates for your instance. Let's Encrypt is changing the way they sign their certificates at the end of the month which breaks support for older Android 设备 (older than Android 7.1).
This 发布 includes an 更新 to make the certificates used by Home Assistant Cloud backward compatible. This relies on a feature that Let's Encrypt provides, which will expire in September 2021.
If you use an older Android 设备 and cannot 升级 to Home Assistant 0.115 or want to use it past September 2021, 安装 the Firefox browser. It includes modern certificates and is able to support the new Let's Encrypt certificates.
HTTP:使用反向代理
The processing of data received from reverse proxies is now more strictly
handled. Invalid or malformed X-Forwarded-For headers will now result in an
HTTP 400 错误 (Bad Request).
Support for X-Forwarded-Proto and X-Forwarded-Host has been added.
Additionally, Home Assistant will now 日志 cases of a reverse proxy being used,
but not configured with Home Assistant. Make sure, you set the
use_x_forwarded_for and trusted_proxies in your Home Assistant HTTP
配置 correctly to avoid 警告.
Instituto Português do Mar e Atmosfera (IPMA)
The precipitation 属性 has been renamed to precipitation_probability.
KNX
The KNX 集成 has been completely refactored to no longer rely on dedicated platform 配置 but instead use the 集成 domain key as the base 配置.
Let's say you've previously used the following 配置:
You'll need to migrate it as follows:
Kodi
Kodi Media Player 配置 is now available through the UI, including discovery. If you have Kodi configured in YAML, it is advised to remove that and use discovery or a manual 配置 through the UI.
Existing YAML entries will be imported, but:
- Your 打开/off 动作 will not be ported. This functionality is now available through 设备 触发器.
- You may have duplicate 实体.
- Kodi must be on when Home Assistant is loading for the first time in order for the 配置 to be imported.
Lovelace 生成(自动)模式
实体 that are generated from mobile apps with the mobile_app 集成
is now hidden in the generated Lovelace view. If you want to continue to display
those you need to take control over your view with the 3 dots in the top right
corner of the Lovelace screen.
(@ludeeus - #6873) (Lovelace docs)
MDI 图标
The MDI icons are updated to 版本 5.5.55, this adds another 100 icons you can use!
In 5.5.55 there was 1 breaking change, if you used the icon mdi:scooter this
has been renamed to mdi:human-scooter and you need to adjust your
配置.
All icons that were deprecated in 0.113.0 have now been removed. Icons that were renamed or deleted in 版本 5.0.45 will no longer work.
Météo-France
The 属性 of next_rain has been reworked. In the previous 版本 it was
a list of objects with changing keys (every 5 minutes) corresponding to a
UTC timestamp. This design was difficult to use in 模板 and 自动化.
The new design will add a dedicated string 属性 to have the reference
timestamp of the forecast (forecast_time_ref) and a dict 属性 with fixed
keys to access the rain forecast within the hour (1_hour_forecast).
Example of the new 属性:
Meteorologisk institutt (Met.no)
While updating the 集成, and its underlying libraries, to use the newer API endpoint, some of the calculations and forecast aggregations were tweaked a bit:
- Use hourly forecast for current 天气, not daily.
- Ensure compared datetime objects are compared in the same time 区域.
- Use highest resolution data from full 24 hours to calculate daily forecast min/max/sum values.
None of these changes are expected to break your 设置, though the data presented might look a little different due to the above.
In addition, all time stamps are now given in UTC. 自动化 that depend on
the datetime key under the 状态 属性 forecast needs to be checked and
updated accordingly.
Netatmo
The 传感器 for wind and gust angle is split up into two 实体 so that it now
returns the direction (e.g., NE) and the actual value (e.g., 178°) rather
than a string containing both (e.g., NE (123°)).
(@cgtobi - #38627) (netatmo docs)
NZBGet
NZBGet is now available via the 集成 UI. This also means it's no longer configured in YAML. Existing 配置 are automatically transitioned to 配置 via UI, so after 升级 your existing YAML entry can be safely removed.
YAML support will be fully removed in Home Assistant 0.117.0.
The NZGGet uptime 传感器 is now a timestamp 传感器 so its 状态 value has changed from number of minutes since startup to a timestamp indicating the start time of the application.
(@ctalkington - #38938 #39425) (nzbget docs)
OAuth2 认证与重定向
集成 using OAuth2 认证 now use the current request URL from the browser as the redirect target, instead of the internal URL setting.
This matches the experience one would expect to happen and removes the need to fiddle around with the internal URL setting.
However, this might require you to 更新 application 设置 when re-authenticating with existing 服务.
Open Hardware Monitor
In some locales numbers with decimals uses "," instead of "." and this causes an issue when trying to use InfluxDB for example. This has been adjusted.
OpenUV
Support for configuring 此integrations has been fully removed. If you have existing OpenUV 配置 in your YAML 配置 files, you can safely remove that 配置.
(@bachya - #38857) (openuv docs)
OpenWeatherMap
The OpenWeatherMap 集成 can now be configured via the UI. After upgrading, your existing 配置 will be imported automatically and you can safely remove existing YAML 配置 for 此integrations.
RFLink
The 集成 has been adjusted and 修改 the entity_id generation for
Rflink 切换 type 灯光. There is a small possibility an 实体 ID has
changed because of this.
(@javicalle - #37992) (rflink docs)
Roku
The Roku 状态 now better aligns with media playback.
Previously, if an app was open, the 状态 would be "playing" even if you were just browsing the app interface. This has been adjusted to be represented as "on". When Roku reports media playback in progress, the 状态 "playing" will be used.
This improves compatibility with exposing 实体 to Alexa, Google Assistant, and HomeKit.
(@ctalkington - #39540) (roku docs)
Sentry
The YAML 配置 for Sentry is now deprecated and no longer works. If you had Sentry configured via YAML previously, you can safely remove the YAML 配置 (without the need to reconfigure) as it has been imported into the UI before.
The 发布 is now formatted with only the 版本 number of Home Assistant
核心, for example, 0.115.0. Previously, this was prefixed with
homeassistant-, for example, homeassistant-0.115.0.
This prefix is now removed.
(@frenck - #38833) (sentry docs)
Squeezebox
The Squeezebox 集成 previously always gave only the current track as
the media_content_id and gave the media_content_type as music.
This leads to unexpected behavior when saving and loading 场景, because only the current track is saved and loaded.
The media_content_id for the squeezebox 集成 may be either a single
URL or a list of them. If a single URL, media_content_type is music.
If a playlist, media_content_type is a playlist. If you are using
自动化 that use media_content_id, you should check if the
media_content_type is music or playlist.
(@rajlaud - #38214) (squeezebox docs)
模板
It is no longer necessary to provide a list of 实体 to monitor for each 模板 platform as automatic analysis can now find all 实体 that affect the 状态 in the 模板 without manual 设置.
This means you can now remove the entity_id option from your 模板,
as it is now deprecated.
The 模板 is now re-evaluated whenever an 实体 that can affect the 模板 状态 changes. New 实体 that can affect the 模板 状态 are automatically discovered each time the 模板 is rendered. This change solves a performance issue where the 模板 would be re-rendered unnecessarily.
Please review the Working without entities section
on the Binary Sensor Template 文档 for
alternative ways to force 模板 实体 to re-evaluate. This includes
模板 that rely on the use of now().
If this change means you need to make adjustments, we have made it easier by
making 模板 实体 reloadable in the YAML configuration reloading
section under Configure Home Assistant -> Server Controls.
主题
The code editor is now themeable, you can set the background color and the color
for the different code blocks. The default background color now is
card-background-color. For some themes this may conflict with the default code
colors. To get the old behavior back add code-editor-background-color: white
to your theme.
时间模式触发器
The time_pattern 触发器 will now reject invalid expressions that were
previously accepted (but did not work as expected).
For example the minutes: /60 would have been accepted previously, but
could never 触发器.
计时器
This will remove the remaining 属性 from the timer unless the timer is
paused. Any workarounds that do exist to use the remaining 属性 to
determine when the timer finishes have to 开关 to use the finishes_at
属性.
(@IcyPalm - #37519) (timer docs)
Timers with a duration longer than a day would format as "1 day, 1:00:00" and that is difficult to use in 模板 or for the 前端 to render. Now it will render as "25:00:00".
(@bramkragten - #38292) (timer docs)
Yandex Transport
The 集成 now accepts a full stop ID in text notation:
'stop__1234' or 'group_345' or '6789'
You'll have to 更新 stop_id: 1234567 in your existing 配置 to
stop_id: stop__1234567 as it is used in Yandex maps API.
Yeelight
The Yeelight 集成 now uses custom SSDP-like discovery instead of the mDNS discovery, since mDNS discovery is removed in new firmwares.
After this change, there will be no longer automatic 配置 based on discovery. 用户 currently using that should set up all 设备 through UI.
(@shenxn - #37191) (yeelight docs)
告别以下内容
- The Prezzi Benzina 集成 has been removed. It was using webscraping to gather its data, which is no longer allowed. (@eliseomartelli - #38736)
- The yr 集成 has been removed after a request from yr.no. Use the Met.no 集成 instead (@Danielhiversen - #39247)
发布 0.115.1 - September 18
- 日志 模板 listeners when 调试 logging is on (@bdraco - #40180)
- 升级 pyvlx to 0.2.17 (@Julius2342 - #40182) (velux docs)
- Fix Vizio async_unload_entry bug (@raman325 - #40210) (vizio docs)
- Fix Nextcloud 传感器 becoming unavailable (@meichthys - #40212) (nextcloud docs)
- Disable async on Apprise (@caronc - #40213) (apprise docs)
- Fix RM mini 3 更新 manager (@felipediel - #40215) (broadlink docs)
- Fix kodi.call_method (@OnFreund - #40236) (kodi docs)
- Handle systems without groups (@OnFreund - #40238) (risco docs)
- Fix coolmaster.info (@OnFreund - #40240) (coolmaster docs)
发布 0.115.2 - September 19
- Get option flow defaults from yaml for non configured MQTT options (@emontnemery - #40177) (MQTT docs)
- Correct modbus 开关 to return correct coil (@janiversen - #40190) (modbus docs)
- Handle an unsupported 设备 in the Broadlink config flow (@felipediel - #40242) (broadlink docs)
- Fix Kodi discovery title (@OnFreund - #40247) (kodi docs)
- Fix high CPU usage in vera 集成. (@vangorra - #40249) (vera docs)
- Updated 前端 to 20200918.0 (@bramkragten - #40253) (前端 docs)
- Bump hangups to 0.4.11 (@dshokouhi - #40258) (hangouts docs)
- 更新 ZHA dependencies (@Adminiuga - #40283) (zha docs)
- Fix 错误 creating duplicate ConfigEntry upon import for rfxtrx (@RobBie1221 - #40296) (rfxtrx docs)
发布 0.115.3 - September 25
- Use Cloud 状态 as alternative 状态 if 条件 unknown (@thehaxxa - #37121)
- Guard SolarEdge for inverters without batteries (@mhaack - #40295) (solaredge docs)
- Ignore packets with missing dts in peek_first_pts (@uvjustin - #40299) (stream docs)
- Axis - Fix list applications breaks if empty response (@Kane610 - #40360) (axis docs)
- Fix Met.no missing 条件 in API forecasts (@thimic - #40373) (met docs)
- Bump pyinsteon to 1.0.8 (@teharris1 - #40383) (insteon docs)
- Fix OSError (@bieniu - #40393) (shelly docs)
- Fix handling of empty ws port (@OnFreund - #40399) (kodi docs)
- Validate Met.no forecast entries before passing them on to HA (@thimic - #40400) (met docs)
- Fix luci device_tracker incorrectly reporting 设备 status (@cagnulein - #40409) (luci docs)
- Make modbus 开关 read_coil failure resistent (@janiversen - #40417) (modbus docs)
- Fix webostv supported features for "external_speaker" sound output (@PedroLamas - #40435) (webostv docs)
- Fix regression in Nextcloud component (@meichthys - #40438) (nextcloud docs)
- Fix proxy 摄像头 conversion with PNG Alpha(RGBA) (@square99 - #40446) (proxy docs)
- Bump accuweather library to 版本 0.0.11 (@bieniu - #40458)
- Increase gogogate2 request timeout (@vangorra - #40461) (gogogate2 docs)
- Fix handling of quoted time_pattern values (@amelchio - #40470) (homeassistant docs)
- Ensure group 状态 is recalculated when re-adding on 重载 (@bdraco - #40497) (group docs)
- Disable audio in stream when audio stream profile is None (@uvjustin - #40521) (stream docs)
- Fix luci device_tracker when 发布 is none (@cagnulein - #40524) (luci docs)
- Increase upnp timeout from 5 seconds to 10 seconds (@StevenLooman - #40540) (upnp docs)
- Fix connection validation during import for dsmr 集成 (@RobBie1221 - #40548) (dsmr docs)
- Updated 前端 to 20200918.2 (@bramkragten - #40549) (前端 docs)
- Fix bug in 状态 触发器 when using for: without to: (@KevinCathcart - #40556) (homeassistant docs)
发布 0.115.4 - September 28
- Bump aioshelly library to 版本 0.3.3 (@bieniu - #40415) (shelly docs)
- Create master playlist for cast (@uvjustin - #40483) (stream docs)
- Fix fitbit current URL not available while configuring (@colinfrei - #40547) (fitbit docs)
- Bump Plugwise-Smile to v1.5.1 (@bouwew - #40572) (plugwise docs)
- Fix 摄像头 play stream (@hunterjm - #40641) (摄像头 docs) (cast docs) (媒体播放器 docs) (stream docs)
- set ID3 tags as TextFrame types (@digitallyserviced - #40666) (tts docs)
- Pin gRPC to 1.31.0 to workaround amrv7 issues (@frenck - #40678)
- Bump Airly package to 1.0.0 (@ak-ambi - #40695) (airly docs)
发布 0.115.5 - September 29
发布 0.115.6 - September 30
- Use custom app to play 摄像头 stream using Google Assistant (@bramkragten - #40750) (google_assistant docs)
所有变更
点击查看所有变更!
- Handle non-existing translations in clean 脚本 (@balloob - #38574)
- Bump androidtv to 0.0.48 and pure-python-adb to 0.3.0.dev0 (@JeffLIrion - #38578) (androidtv docs)
- Add support for Philips Hue Smart 按钮 (@clarkd - #38555) (deconz docs) (hue docs)
- Add devolo blinds 设备 (@2Fake - #36597) (devolo_home_control docs) (new-platform)
- Support Next/Previous for InputSelector (@elupus - #38378) (google_assistant docs)
- Add node firmware to ozw 设备 registry (@DelusionalAI - #38330) (ozw docs)
- Change http to auto for cast media 图像 url (@KTibow - #38242) (cast docs)
- Remove wrong 更新 per 核心 design on ZHA (@pvizeli - #38599) (zha docs)
- Add events to Dynalite platform (@ziv1234 - #38583) (dynalite docs)
- Add vizio 服务 to 更新 a 设备 setting (@raman325 - #36739) (vizio docs)
- Do not report google 状态 if nothing to report (@balloob - #38608) (google_assistant docs)
- 开关 Netatmo 集成 to dispatcher for internal communication (@cgtobi - #38590) (netatmo docs)
- Bump 版本 to 0.115.0dev0 (@frenck - #38606)
- Remove unused async_setup_platform from HLK-SW16 开关 (@jameshilliard - #38648) (hlk_sw16 docs)
- Automatically 开关 mpd between resume and start playing on media_play (@Vaarlion - #37854) (mpd docs)
- Raise 错误 when unsupported (old) Bond firmware is detected (@prystupa - #38650) (bond docs)
- Standardize Vizio 更新 服务 schema (@raman325 - #38636) (vizio docs)
- 更新 Tesla to use DataUpdateCoordinator (@alandtse - #38306) (tesla docs)
- Bump teslajsonpy to 0.10.4 (@alandtse - #38652) (tesla docs)
- Bump pyupgrade to v2.7.2 (@basnijholt - #38629)
- Bump yamllint to v1.24.2 (@basnijholt - #38633)
- Bump codespell from v1.16.0 to v1.17.1 and fix new spelling 错误 (@basnijholt - #38663)
- Bump pre-commit-hooks from v2.40 to v3.2.0 (@basnijholt - #38664)
- Bump env_canada to 0.2.0 (@michaeldavie - #37467) (environment_canada docs)
- Add support for reload_on_update to _abort_if_unique_id_configured (@bdraco - #38638)
- Add 设备 classes for electrical measurement (@fabiocastagnino - #36800) (传感器 docs)
- Add support for exposing 灯光 effects via Google Assistant (@mjg59 - #38575) (google_assistant docs)
- Support extracting 实体 by domain from 模板 (@bdraco - #38647)
- Improve performance of fetching the 状态 domain (@bdraco - #38653)
- Support muting and relative-volume 媒体播放器 in Google Assistant (@blueshiftlabs - #38651) (google_assistant docs)
- Add current request context to get_url 助手 (@frenck - #38602) (http docs)
- Address requested code changes in Tesla (@alandtse - #38680) (tesla docs)
- Improve tests for AccuWeather 集成 (@bieniu - #38621) (accuweather docs)
- Bump 版本 of aiopvpc to v2.0.2 (@azogue - #38691) (pvpc_hourly_pricing docs)
- Fix Kodi play_media media type casing (@imduffy15 - #38665) (kodi docs)
- Add missing Short type to set_config_param (@firstof9 - #38618) (ozw docs)
- Make CoolMasterNet 集成 async (@OnFreund - #38643) (coolmaster docs)
- Add Nightscout 集成 (@marciogranzotto - #38615) (nightscout docs) (new-集成)
- Add DataUpdateCoordinator to met 集成 (@bruxy70 - #38405) (met docs)
- Use global CONF_UNIQUE_ID for hue (@michaelarnauts - #38596) (hue docs)
- Use global CONF_UNIQUE_ID for deconz (@michaelarnauts - #38597) (deconz docs)
- Persist hive 灯光 brightness for color change (@alxwrd - #38677) (hive docs)
- Add support for boost and eco modes to Daikin 温控 (@viiru- - #37282) (daikin docs)
- Use global CONF_UNIQUE_ID for MQTT (@michaelarnauts - #38595) (MQTT docs)
- Add SolarEdge battery level and dynamic icon for storage 传感器 (@mhaack - #37826) (solaredge docs)
- add event and 设备 动作 for when 设备 drop (@dmulcahey - #38701) (zha docs)
- Fix homekit_controller pairing retry when the first attempt is busy (@bdraco - #38605) (homekit_controller docs)
- Implement local discovery of Smappee legacy 设备 (@bsmappee - #37812) (smappee docs)
- Add support for Flo by Moen water shutoff 设备 (@dmulcahey - #38171) (flo docs) (new-集成)
- Add water level 传感器 provided by UK Environment Agency (@Jc2k - #31954) (eafm docs) (new-集成)
- Bump devolo-home-control-api to 0.13.0 (@2Fake - #38718) (devolo_home_control docs)
- Add Dynalite current preset 服务 (@ziv1234 - #38689) (dynalite docs)
- Add current 设备 class to WLED current 传感器 (@frenck - #38687) (wled docs)
- Ignore requirements for env_canada (@frenck - #38731)
- Add URL as common string (@ctalkington - #38694)
- Add hourly forecast to met.no (@bruxy70 - #38700) (met docs)
- 更新 IPMA 天气 component (@dgomes - #38697) (ipma docs) (breaking-change)
- Remove prezzibenzina 集成 (ADR-0004) (@eliseomartelli - #38736) (breaking-change)
- Add Ecobee 服务 (@hudcap - #38749) (ecobee docs)
- [RFC] Add Tag 集成 (@dmulcahey - #38727) (default_config docs) (tag docs) (new-集成)
- 更新 Flo config flow and associated tests (@dmulcahey - #38722) (flo docs)
- Mobile App 集成 to use tag 集成 (@balloob - #38757) (mobile_app docs)
- Bump Rachiopy 版本 to 0.1.4 (@brg468 - #38761) (rachio docs)
- Move DwdWeatherWarningsAPI to a library hosted on PyPI (@stephan192 - #34820) (dwd_weather_warnings docs) (breaking-change)
- Speed up OZW availability check (@balloob - #38758) (ozw docs)
- Add Dynalite 服务 to request the channel level (@ziv1234 - #38735) (dynalite docs)
- Add power 传感器 for Aqara Wall Plug (@VDigitall - #38672) (xiaomi_aqara docs)
- Add energy 设备 class to Toon 传感器 (@frenck - #38686) (toon docs)
- Time 触发器 can also accept an input_datetime 实体 ID (@pnbruckner - #38698) (自动化 docs)
- Enable PAHO MQTT client logging (@emontnemery - #38767) (MQTT docs)
- Improve X-Forwarded-* request headers handling (@frenck - #38696) (http docs) (breaking-change)
- Adapt the ONVIF Renewal termination_time for Amcrest 摄像头 (@esev - #37750) (onvif docs)
- Revert "Add energy 设备 class to Toon 传感器" (@frenck - #38768) (toon docs)
- Add H.265 support to stream component (@uvjustin - #38125) (stream docs)
- Stream clients operate on a copy of the intnernal self._outputs dict (@esev - #38766) (stream docs)
- Allow ONVIF 设备 to resume a PullPoint subscription when the 摄像头 reboots (@esev - #37711) (onvif docs)
- Cleanup Netatmo code (@cgtobi - #38772) (netatmo docs)
- Add config flow to insteon component (@teharris1 - #36467) (insteon docs)
- Bump androidtv to 0.0.49 (@JeffLIrion - #38778) (androidtv docs)
- Bump 动作/设置-python from v2.1.1 to v2.1.2 (@dependabot - #38780)
- Bump 动作/upload-artifact from v2.1.3 to v2.1.4 (@dependabot - #38779)
- Remove Netatmo HomeKit discovery method (@cgtobi - #38770) (netatmo docs)
- Add roon media player 集成 (@pavoni - #37553) (roon docs) (new-集成)
- Unsubscribe ozw listeners (@MartinHjelmare - #38787) (ozw docs)
- Add dynalite level preset (@ziv1234 - #37533) (dynalite docs)
- Addressing feedback from #37711 (@esev - #38781) (onvif docs)
- Use the shared zeroconf instance when attempting to create another Zeroconf instance (@bdraco - #38744) (zeroconf docs)
- Simplify vizio unique ID check since only IP and 设备 class are needed (@raman325 - #37692) (vizio docs)
- 更新 脚本 助手 constructor parameters (@pnbruckner - #38763)
- Add async_track_state_added_domain for tracking when 状态 are added to a domain (@bdraco - #38776)
- Create variable with result of wait_template and accept 模板 for timeout option (@pnbruckner - #38634) (自动化 docs) (generic_thermostat docs) (ness_alarm docs) (speedtestdotnet docs) (模板 docs) (toon docs) (xiaomi_miio docs)
- Add refresh_node_info command to OZW websocket api (@cgarwood - #38573) (ozw docs)
- async_get_instance was not reentrant during await (@elupus - #38263)
- 助手 type hint improvements (@scop - #38522)
- 更新 to use latest konnected py module (@kit-klein - #38803) (konnected docs)
- 更新 pyipp to 0.11.0 (@ctalkington - #38820) (ipp docs)
- 更新 rokuecp to 0.6.0 (@ctalkington - #38819) (roku docs)
- Add Agent DVR 报警 Control 面板 (@ispysoftware - #36468) (agent_dvr docs) (new-platform)
- Cleanup Netatmo 传感器 (@cgtobi - #38627) (netatmo docs) (breaking-change)
- Add default_* to 设备 registry (@balloob - #38829) (mikrotik docs)
- Convert Channels platform 服务 to use platform register (@balloob - #38827) (channels docs)
- Add 二元sensor support to the Flo 集成 (@dmulcahey - #38267) (flo docs) (new-集成)
- Nightscout PR fixes (@marciogranzotto - #38737) (nightscout docs)
- Add 开关 support to the Flo 集成 (@dmulcahey - #38268) (flo docs) (new-集成)
- Fix typo in 媒体播放器 docstring (@cgarwood - #38843) (媒体播放器 docs)
- Fix iqvia test patching the wrong 集成 (@bdraco - #38847) (iqvia docs)
- Remove superfluous netatmo icons (@cgtobi - #38859) (netatmo docs)
- Bump pysyncthru to 0.7.0 (@nielstron - #38832) (syncthru docs)
- Fix Freebox unsub dispatcher (@Quentame - #38842) (freebox docs)
- Disable env_canada pylint import 错误 (@MartinHjelmare - #38868) (environment_canada docs)
- Fix logger name (@balloob - #38866) (input_boolean docs) (tag docs) (区域 docs)
- Add sympathy review check box to PR 模板 (@MartinHjelmare - #38867)
- Add Slack url icon support (@arychj - #38814) (slack docs)
- Fix PR link in PR 模板 (@MartinHjelmare - #38871)
- Adjust homekit controller pairing to have a new step for each potentially recoverable 错误 (@bdraco - #38742) (homekit_controller docs)
- Get more detailed info for growatt_server (@indykoning - #38852) (growatt_server docs)
- Bump apprise to 0.8.7 (@caronc - #38886) (apprise docs)
- Handle missing MAC address during daikin discovery (@fredrike - #38840) (daikin docs)
- Bump aiohomekit to 0.2.47 (@Jc2k - #38901) (homekit_controller docs)
- Use current request context in OAuth redirect (@frenck - #38692) (breaking-change)
- Add new growatt_server 设备 class constants (@indykoning - #38906) (growatt_server docs)
- Add track_template_result method to events (@bdraco - #38802)
- Fix 日志 message format in daikin (@ctalkington - #38920) (daikin docs)
- bump the 版本 of openevsewifi to latest upstream 1.1.0 (@ausil - #38892) (openevse docs)
- Huawei LTE 设备 registry improvements (@scop - #38925) (huawei_lte docs)
- 更新 TrackTemplateResultInfo to remove side effects from init (@bdraco - #38934)
- Set up konnected 实体 even if 面板 isn't immediately reachable (@kit-klein - #38879) (konnected docs)
- Remove deprecated YAML config from OpenUV (@bachya - #38857) (openuv docs) (breaking-change)
- Improve Netatmo 传感器 naming (@cgtobi - #38957) (netatmo docs)
- Fix Konnected pro options (@kit-klein - #38848) (konnected docs)
- 安装 ffmpeg on Travis CI for homekit 摄像头 tests (@scop - #38955)
- Reorganize 触发器 code (@pnbruckner - #38655)
- 更新 python-velbus to 2.0.44 (@thomasdelaet - #38966) (velbus docs)
- 状态 and 服务 related type hint improvements (@scop - #38956) (ipp docs) (sonarr docs) (wled docs)
- Add wind max speed to trafikverket_weatherstation (@endor-force - #38929) (trafikverket_train docs) (trafikverket_weatherstation docs)
- Make check-executables-have-shebangs manual (@emontnemery - #38980)
- Bump python-openzwave-MQTT to 1.0.5 (@cgarwood - #38984) (ozw docs)
- Allow empty cast 媒体播放器 config (@emontnemery - #38971) (cast docs)
- Bump codecov/codecov-动作 from v1.0.12 to v1.0.13 (@dependabot - #38991)
- Fix time 触发器 test (@pnbruckner - #38988) (homeassistant docs)
- Bump pysuez to 0.1.19 (@ooii - #38998) (suez_water docs)
- Add 触发器 for the Tag component (@dmulcahey - #39004) (tag docs)
- 更新 emulated_hue to allow getting bridge config without username (@kbickar - #38986) (emulated_hue docs)
- Improve time_pattern validation schema (@amelchio - #38982) (homeassistant docs) (breaking-change)
- Extend IP ban / failed login 通知 information (@frenck - #39020) (http docs)
- Make ping binary_sensor 更新 async (@Misiu - #35301) (ping docs)
- Add Rachio 区域 moisture 服务 (@brg468 - #38817) (rachio docs)
- Add 图像 集成 (@balloob - #38969) (media_manager docs) (new-集成)
- Track 实体 sources (@balloob - #37258)
- Add websocket command to get a list of OZW instances and their status (@cgarwood - #39019) (ozw docs)
- Fix ws create tags (@bramkragten - #39043) (tag docs)
- Add support for 属性 in (numeric) 状态 条件 (@frenck - #39050)
- Smart Meter Texas 集成 (@grahamwetzler - #37966) (smart_meter_texas docs) (new-集成)
- Clean up feedreader files at the end (@felipediel - #39064) (feedreader docs)
- Ensure speedtest cancels the listener on options 更新 (@bdraco - #39062) (speedtestdotnet docs)
- Add audio to stream (@uvjustin - #38846) (stream docs)
- 升级 to aioymaps==1.1.0 to support new types of stops #39006 (@devbis - #39021) (yandex_transport docs) (breaking-change)
- Sentry 集成 enhancements (@frenck - #38833) (sentry docs) (breaking-change)
- Fix slower tests in sonarr (@ctalkington - #39073) (sonarr docs)
- 更新 模板 传感器 to use async_track_template_result (@bdraco - #38940) (模板 docs)
- Convert 模板 门锁 to use async_track_template_result (@bdraco - #38946) (模板 docs)
- Convert 模板 开关 to use async_track_template_result (@bdraco - #38950) (模板 docs)
- Convert 模板 风扇 to use async_track_template_result (@bdraco - #38983) (模板 docs)
- Convert 模板 alarm_control_panel to use async_track_template_result (@bdraco - #39014) (模板 docs)
- Convert 模板 binary_sensor to use async_track_template_result (@bdraco - #39027) (模板 docs)
- Fix hlk-sw16 checksum decode. (@jameshilliard - #39080) (hlk_sw16 docs)
- Convert 模板 遮盖 to use async_track_template_result (@bdraco - #39042) (模板 docs)
- Convert 模板 灯光 to use async_track_template_result (@bdraco - #39045) (模板 docs)
- Convert 模板 吸尘器 to use async_track_template_result (@bdraco - #39047) (模板 docs)
- Remove unused code from the 模板 集成 (@bdraco - #39048) (模板 docs)
- Implement config flow in the Broadlink 集成 (@felipediel - #36914) (broadlink docs) (breaking-change)
- 更新 前端 to 20200820.0 (@bramkragten - #39085) (前端 docs)
- Generate ID when not provided (@bramkragten - #39082) (tag docs)
- Pre-create homekit_controller 设备 registry entries when processing 实体 map (@Jc2k - #39036) (homekit_controller docs)
- Prefer mac for onvif 设备 identifier (@foxel - #38864) (onvif docs)
- 更新 DOODS name (@thrust15 - #38997) (doods docs)
- Add config flow to kodi (@OnFreund - #38551) (discovery docs) (kodi docs) (breaking-change)
- Add wait_for_trigger 脚本 动作 (@pnbruckner - #38075) (自动化 docs)
- Remove dead ozw discovery code (@MartinHjelmare - #39098) (ozw docs)
- Use SimpleQueue for recorder (@bdraco - #38967) (recorder docs)
- 更新 websocket api to use async_track_template_result (@bdraco - #39057) (websocket_api docs)
- Deprecate optional 脚本 context (@balloob - #39034) (intent_script docs) (kodi docs) (panasonic_viera docs) (samsungtv docs) (模板 docs) (webostv docs)
- Skip the sqlite quick_check on clean restarts (@bdraco - #38972) (recorder docs)
- Prevent invalid data from being passed to zeroconf (@bdraco - #39009) (zeroconf docs)
- Simplify 模板 集成 实体 (@bdraco - #39083) (模板 docs)
- 更新 模板 触发器 to use async_track_template_result (@bdraco - #39059) (模板 docs)
- 更新 Notion to use a DataUpdateCoordinator (@bachya - #38978) (notion docs)
- correct naming (@2Fake - #39102) (devolo_home_control docs)
- Fix for exception when checking if 风扇 without speed is on (@kbickar - #39096) (风扇 docs) (MQTT docs)
- Clean up more netgear_lte resources on shutdown (@amelchio - #39065) (netgear_lte docs)
- Add wemo 'Socket' model for Homekit discovery (@esev - #38765) (wemo docs)
- Support unknown mime type for 图像 attachments in html email (@esev - #38682) (smtp docs)
- Allow Slack 通知 to change username/icon on the fly (@bachya - #39091)
- Wait for broker to ACK MQTT operations (@emontnemery - #39051) (MQTT docs)
- Warn when casting of tts fails (@emontnemery - #38603) (cast docs) (tts docs)
- Tweak OZW Websocket Instance/Network Responses (@cgarwood - #39107) (ozw docs)
- Improve tests and config flow for Smart Meter Texas (@grahamwetzler - #39089)
- 更新 issue 模板 for new 日志 location (@SeanPM5 - #39115)
- Bump plexapi to 4.1.0 (@jjlawren - #39118) (plex docs)
- Allow templating keys in data_template (@basnijholt - #39008)
- Add OZW network_statistics websocket command (@cgarwood - #39124) (ozw docs) (new-集成)
- Make 模板 实体 reloadable (@bdraco - #39075) (模板 docs)
- Add Risco 集成 (@OnFreund - #36930) (risco docs) (new-集成)
- Fix flapping recorder last run test (@bdraco - #39134) (recorder docs)
- Risco code review follow ups (@OnFreund - #39143) (risco docs)
- Fix Vizio pylance 错误 by using schema extend instead of dict 更新 (@raman325 - #39139) (vizio docs)
- 升级 volkszaehler to 0.1.3 (@fabaff - #39147) (volkszaehler docs)
- 升级 pylast to 3.3.0 (@fabaff - #39151) (lastfm docs)
- Add risco options flow (@OnFreund - #39154) (risco docs)
- Fix Sentry 用户 context and system info (@frenck - #39130) (sentry docs)
- Address Kodi code review follow up (@OnFreund - #39104) (kodi docs)
- 升级 beautifulsoup4 to 4.9.1 (@fabaff - #39158) (scrape docs)
- 升级 praw to 7.1.0 (@fabaff - #39152) (reddit docs)
- 升级 connect-box to 0.2.7 (@fabaff - #39162) (upc_connect docs)
- 升级 sendgrid to 6.4.6 (@fabaff - #39148) (sendgrid docs)
- 升级 python-whois to 0.7.3 (@fabaff - #39153) (whois docs)
- 升级 slixmpp to 1.5.2 (@fabaff - #39169) (xmpp docs)
- add 区域 status 属性 so we can know if queued (@ktownsend-personal - #39133) (rainmachine docs)
- 升级 sqlalchemy to 1.3.19 (@fabaff - #39167) (recorder docs) (sql docs)
- 升级 jinja2 to >=2.11.2 (@fabaff - #39161)
- 更新 universal 媒体播放器 to use async_track_template_result (@bdraco - #39054) (universal docs)
- 升级 psutil to 5.7.2 (@fabaff - #39149) (systemmonitor docs)
- Add 二元sensor to Risco 集成 (@OnFreund - #39137) (risco docs) (new-platform)
- Fix unmocked calls in melcloud (@ctalkington - #39170) (melcloud docs)
- Make emulated_hue upnp responder async (@bdraco - #39126) (emulated_hue docs)
- Improve the performance of dt_util.utcnow() (@bdraco - #39145)
- Convert bayesian binary_sensor to use async_track_template_result (@bdraco - #39174) (bayesian docs)
- 升级 mutagen to 1.45.1 (@fabaff - #39166) (tts docs)
- 升级 discord.py to 1.4.1 (@fabaff - #39150) (discord docs)
- 升级 colorlog to 4.2.1 (@fabaff - #39159)
- 升级 TwitterAPI to 2.5.13 (@fabaff - #39157) (twitter docs)
- Allow multiple config entries per host for transmission (@JPHutchins - #39127) (transmission docs)
- Add ZwaveStringSensor to OZW 集成 (@zyberzero - #38676) (ozw docs)
- 升级 pre-commit to 2.7.0 (@frenck - #39180)
- 升级 discogs_client to 2.3.0 (@fabaff - #39164) (discogs docs)
- 升级 py-cpuinfo to 7.0.0 (@fabaff - #39155) (cpuspeed docs) (breaking-change)
- Support Rainbow radar site in BOM 摄像头 (@maddenp - #39129)
- 更新 bug report 模板 for new 日志 location (@lukashass - #39183)
- Add pin code support to the Risco 集成 (@OnFreund - #39177) (risco docs)
- Report usage of extract_entities by custom components (@bdraco - #39185)
- Add unique_id to solarlog 传感器 (@Ernst79 - #39186) (solarlog docs)
- Trim CW from RGB when not supported in ozw (@firstof9 - #39191) (ozw docs)
- 升级 debugpy to 1.0.0rc2 (@frenck - #39195) (debugpy docs)
- Only 重载 config entry if it is loaded (@balloob - #39202) (volumio docs)
- Fix race when waiting for MQTT ACK (@emontnemery - #39193) (MQTT docs)
- Websocket media browsing for Plex (@jjlawren - #35590) (plex docs)
- Add Shelly 集成 (@balloob - #39178) (shelly docs) (new-集成)
- 升级 pre-commit to 2.7.1 (@frenck - #39206)
- 100% test coverage for Shelly config flow (@balloob - #39209) (shelly docs)
- Add shortcuts when we know 模板 is static (@balloob - #39208)
- Add Wilight 集成 with SSDP (@leofig-rj - #36694) (wilight docs) (new-集成)
- Allow 模板 in data & 服务 parameters (making data_template & service_template obsolete) (@frenck - #39210)
- Don't sort keys when dumping json and yaml (@bramkragten - #39214) (http docs)
- Standardize uuid generation for events/storage/registry (@bdraco - #39184)
- Minor cleanup of MQTT ACK handling (@emontnemery - #39217) (MQTT docs)
- Include the first seen context data in the logbook api (@bdraco - #39194) (logbook docs)
- Updated 前端 to 20200824.0 (@bramkragten - #39224) (前端 docs)
- Add websocket 触发器/条件 commands (@balloob - #39109) (homeassistant docs) (模板 docs) (websocket_api docs) (区域 docs)
- 更新 sense icon mappings (@bdraco - #39225) (sense docs)
- Bump python-temascal to 0.2 for lg_soundbar (@akinomeroglu - #39213) (lg_soundbar docs)
- Remove 'entity_id' from ToggleRflinkLight (@javicalle - #37992) (rflink docs) (breaking-change)
- Allow owner 用户 to change 密码 of any 用户 (@balloob - #39242) (config docs)
- Fix hassio auth data (@balloob - #39244) (config docs) (hassio docs)
- Add support for 属性 in 状态/numeric 状态 触发器 (@balloob - #39238) (homeassistant docs)
- Wait before sending MQTT birth message (@emontnemery - #39120) (MQTT docs)
- Ensure unique ids are generated for surepetcare (@ctalkington - #39196) (surepetcare docs)
- Add HomeKit Controller heater-cooler 设备 (@vfreex - #38979) (homekit_controller docs)
- Remove yr 集成 after a request from yr.no (@Danielhiversen - #39247) (breaking-change)
- 更新 homeassistant base 图像 8.3.0 (@pvizeli - #39245)
- Subscribe to 状态 change events only if the 模板 has 实体 (@bdraco - #39188) (模板 docs)
- Ensure the context is passed to group changes (@bdraco - #39221) (group docs)
- Support reloading the universal platform (@bdraco - #39248) (模板 docs) (universal docs)
- Ensure 模板 tracking can recover after the 模板 generates an exception (@bdraco - #39256)
- Implement local discovery of Smappee series-2 设备 and improvements (@bsmappee - #38728) (smappee docs)
- Add api to 重载 config entries (@bdraco - #39068) (config docs)
- Add the ability to 重载 灯光/遮盖 groups from yaml (@bdraco - #39250) (group docs) (模板 docs) (universal docs)
- Rename 实体 base class for HMIPC (@SukramJ - #39243) (homematicip_cloud docs)
- Add the ability to 重载 the rest platforms from yaml (@bdraco - #39257) (group docs) (rest docs) (模板 docs) (universal docs)
- Add the ability to 重载 command_line platforms from yaml (@bdraco - #39262) (command_line docs) (group docs) (rest docs) (模板 docs) (universal docs)
- Add the ability to 重载 filter platforms from yaml (@bdraco - #39267) (filter docs)
- Allow disabling 集成 in manifest, block uuid package being 已安装 and disable ezviz (@balloob - #38444) (ezviz docs) (breaking-change)
- 版本 bump panasonic_viera to 0.3.6 (@evilmarty - #39269) (panasonic_viera docs)
- Remove 服务.yaml from the Broadlink 集成 (@felipediel - #39261) (broadlink docs)
- Bump brother library to 版本 0.1.15 (@bieniu - #39226) (brother docs) (breaking-change)
- Add timestamp option for input_datetime.set_datetime (@pnbruckner - #39121) (input_datetime docs)
- Add cache 版本 to GitHub 动作 CI (@frenck - #39277)
- Prevent bluepy from being part of requirements_all.txt (@balloob - #39275)
- Block typing from being 已安装 (@balloob - #37707) (breaking-change)
- Add the ability to 重载 statistics platforms from yaml (@bdraco - #39268) (statistics docs)
- Bump CI cache (@balloob - #39283)
- Drop last bits of asyncio.coroutine (@balloob - #39280) (mqtt_eventstream docs) (shell_command docs)
- Cleanup the rest 重载 test to use the pytest requests_mock fixture (@bdraco - #39282) (rest docs)
- Centralize knx config and 更新 xknx to 0.12.0 (@marvin-w - #39219) (knx docs) (breaking-change)
- Add tests for Plex media browser (@jjlawren - #39220) (plex docs)
- Allow passing in 用户 id instead of username to change 密码 (@balloob - #39266) (config docs)
- Add tests for Broadlink 传感器 (@felipediel - #39230) (broadlink docs)
- Updated certifi to > 2020.6.20 (@fabaff - #39160)
- Bump hangups to 0.4.10 (@MartinHjelmare - #39312) (hangouts docs)
- Fix Panasonic Viera config flow and 状态 更新 (@joogps - #39303) (panasonic_viera docs)
- 升级 black to 20.8b1 (@frenck - #39287)
- Remove protobuf requirement from tensorflow manifest (@MartinHjelmare - #39316) (tensorflow docs)
- Bump zigpy-cc 版本 (@matgad - #39318) (zha docs)
- Trivial requirements cleanups (@scop - #39222)
- Skip 安装 on tox pylint (@scop - #39260)
- Add Spotify media browser capability (@cgtobi - #39240) (spotify docs)
- Add get_nodes command to OZW websocket api (@cgarwood - #39317) (ozw docs)
- Use boolean for MQTT 风扇 状态 (@emontnemery - #39332) (MQTT docs)
- Meteo france "next_rain" 属性 rework (@oncleben31 - #39092) (meteo_france docs) (breaking-change)
- Prevent duckdns from consuming 100% cpu when time abruptly moves forward (@bdraco - #39334) (duckdns docs)
- Bump zeroconf to 0.28.2 (@pawlizio - #39322) (zeroconf docs)
- 开关 duckdns to use async_call_later (@bdraco - #39339) (duckdns docs)
- Bump rflink to 0.0.54 (@jgrob1 - #39342) (rflink docs)
- Add (un)bypass 服务 to Risco (@OnFreund - #39292) (risco docs)
- Add Custom mapping of Risco 状态 (@OnFreund - #39218) (risco docs)
- Improve volume handling for Roon (@pavoni - #39119) (roon docs)
- Support selecting http vs https protocols for qvrpro (@woneill - #38951) (qvr_pro docs)
- Add the ability to 重载 trend platforms from yaml (@bdraco - #39341) (trend docs)
- Add the ability to 重载 filesize platforms from yaml (@bdraco - #39347) (filesize docs)
- Add the ability to 重载 generic_thermostat platforms from yaml (@bdraco - #39291) (generic_thermostat docs)
- Add 设备 属性 for homematicip_cloud rotary handle (@SukramJ - #39144) (homematicip_cloud docs)
- Add the ability to 重载 history_stats platforms from yaml (@bdraco - #39337) (history_stats docs)
- fix black on generic_thermostat tests (@ctalkington - #39350) (generic_thermostat docs)
- Fix black on homematicip_cloud binary_sensor (@ctalkington - #39351) (homematicip_cloud docs)
- Bump arcam fmj with no 安装 requires on asyncio (@elupus - #39353) (arcam_fmj docs)
- Exception chaining and wrapping improvements (@scop - #39320)
- Use icmplib for ping when available (@bdraco - #39284) (ping docs)
- Ensure we always fire time pattern changes after microsecond 0 (@bdraco - #39302)
- 更新 time 触发器 to use async_track_state_change_event (@bdraco - #39338) (homeassistant docs)
- Add the ability to 重载 generic platforms from yaml (@bdraco - #39289) (generic docs)
- Add the ability to 重载 homekit from yaml (@bdraco - #39326) (homekit docs)
- Allow exposing domains in cloud (@balloob - #39216) (cloud docs)
- Add description of what caused an 自动化 触发器 to fire (@pnbruckner - #39251) (arcam_fmj docs) (自动化 docs) (geo_location docs) (homeassistant docs) (kodi docs) (litejet docs) (MQTT docs) (sun docs) (模板 docs) (Webhook docs) (区域 docs)
- Add support for reloading min_max from yaml (@bdraco - #39327) (min_max docs)
- Add support for hmi208(xiaomi plug BLE) (@saury - #39306) (xiaomi_miio docs)
- Add basic 灯光 and 传感器 support to Shelly (@balloob - #39288) (shelly docs) (new-platform)
- Register mobile_app 通知 服务 when a new 设备 is added (@bdraco - #39356) (mobile_app docs) (通知 docs)
- Simplify mobile app debugging by adding sender 设备 name (@anyuta1166 - #38518) (mobile_app docs)
- Unregister mobile_app 通知 服务 when a 设备 is removed (@bdraco - #39359) (mobile_app docs) (通知 docs)
- Add the ability to 重载 ping platforms from yaml (@bdraco - #39344) (ping docs)
- Fix sun 集成 vulnerability to sudden large clock changes (@pnbruckner - #39335) (sun docs)
- Ensure mobile_app 通知 get re-registered after adding,removing,adding (@bdraco - #39362) (mobile_app docs) (通知 docs)
- Reduce 自动化 状态 changes by using 脚本 助手's last_triggered 属性 (@pnbruckner - #39323) (自动化 docs) (breaking-change)
- Increase test coverage for rfxtrx 集成 (@RobBie1221 - #39340) (rfxtrx docs)
- Add missing status mappings for xiaomi_miio (@rytilahti - #39357) (xiaomi_miio docs)
- bump pymediaroom (@dgomes - #39360) (mediaroom docs)
- 重载 mobile app 通知 服务 upon 设备 name change, add 设备 name to all Webhook 日志 (@dshokouhi - #39364) (mobile_app docs)
- Add Netatmo 摄像头 灯光 服务 (@cgtobi - #39354) (netatmo docs)
- Fix todoist 日历 events (@boralyl - #39197) (todoist docs)
- Add basic 门锁 support for fibaro (@pbalogh77 - #38962) (fibaro docs) (new-platform)
- Improve patching in broadlink 传感器 tests (@ctalkington - #39366) (broadlink docs)
- Fix sun test to patch time since it is now refetched (@bdraco - #39372) (sun docs)
- 升级 pylint to 2.6.0 (@scop - #39363)
- 升级 isort to 5.4.2 (@scop - #37939)
- 升级 pydocstyle to 5.1.0 (@scop - #39374)
- Catch bad 设备 when Google Sync (@balloob - #39377) (google_assistant docs)
- Bump python-temescal to 0.3 for lg_soundbar (@bernimoses - #39379) (lg_soundbar docs)
- Support acpartner in aqara discovery (@shenxn - #37926) (xiaomi_aqara docs)
- 重载 通知 platforms concurrently with asyncio.gather (@bdraco - #39384) (通知 docs)
- Add config flow to nzbget (@ctalkington - #38938) (nzbget docs) (breaking-change)
- Fix bond 风扇.turn_on with OFF speed (@prystupa - #39387) (bond docs)
- 升级 eternalegypt to 0.0.12 (@amelchio - #39386) (netgear_lte docs)
- Revert "Support selecting http vs https protocols for qvrpro (#38951)" (@frenck - #39385) (qvr_pro docs)
- Improve handling of exceptions in Android TV (@JeffLIrion - #39229) (androidtv docs)
- Tune logbook performance to accomodate recent changes (@bdraco - #39348) (自动化 docs) (logbook docs) (脚本 docs)
- Add device_class safety to synology_dsm storage binary_sensors (@Mariusthvdb - #39310) (synology_dsm docs)
- Create a CoordinatorEntity class to avoid repating code in 集成 (@bdraco - #39388)
- Fix marytts sync requests within event loop (@ctalkington - #39399) (marytts docs)
- Add basic binary_sensor support to Shelly (@bieniu - #39365) (shelly docs) (new-platform)
- Add more 传感器 to the Shelly 集成 (@bieniu - #39368) (shelly docs)
- 更新 air_quality to use CoordinatorEntity (@springstan - #39410) (airly docs)
- Fix huawei_lte duplicate 设备 registry identifiers (@scop - #39409) (huawei_lte docs)
- Do not break Alexa sync when encounter bad 实体 (@balloob - #39380) (alexa docs)
- 更新 powerwall to use CoordinatorEntity (@bdraco - #39389) (powerwall docs)
- 更新 griddy to use CoordinatorEntity (@bdraco - #39392) (griddy docs)
- 更新 myq to use CoordinatorEntity (@bdraco - #39393) (myq docs)
- 更新 nut to use CoordinatorEntity (@bdraco - #39394) (nut docs)
- 更新 updater to use CoordinatorEntity (@bdraco - #39396) (updater docs)
- 更新 cert_expiry to use CoordinatorEntity (@bdraco - #39397) (cert_expiry docs)
- 更新 airly to use CoordinatorEntity (@springstan - #39413) (airly docs)
- 更新 roku to use CoordinatorEntity (@ctalkington - #39405) (roku docs)
- 更新 atag to use CoordinatorEntity (@springstan - #39414) (atag docs)
- 更新 nexia to use CoordinatorEntity (@bdraco - #39391) (nexia docs)
- Google: Recover from an 实体 raising while serializing query (@balloob - #39381) (google_assistant docs)
- Add sharkiq 集成 for Shark IQ robot 吸尘器 (@ajmarks - #38272) (sharkiq docs) (new-集成)
- CoordinatorEntity to call super added_to_hass (@balloob - #39416)
- 更新 nzbget to use CoordinatorEntity (@ctalkington - #39406) (nzbget docs)
- 更新 speedtestdotnet to use CoordinatorEntity (@springstan - #39404) (speedtestdotnet docs)
- Format sharkiq with black (@springstan - #39422) (sharkiq docs)
- 更新 airvisual to use CoordinatorEntity (@springstan - #39417) (airvisual docs)
- 更新 brother to use CoordinatorEntity (@springstan - #39418) (brother docs)
- 更新 accuweather to use CoordinatorEntity (@springstan - #39408) (accuweather docs)
- 更新 ipp to use CoordinatorEntity (@ctalkington - #39412) (ipp docs)
- 更新 eafm to use CoordinatorEntity (@springstan - #39420) (eafm docs)
- 更新 gios to use CoordinatorEntity (@springstan - #39421) (gios docs)
- 更新 juicenet to use CoordinatorEntity (@springstan - #39424) (juicenet docs)
- 更新 smart_meter_texas to use CoordinatorEntity (@bdraco - #39426) (smart_meter_texas docs)
- Fix pylint erros for sharkiq (@springstan - #39428) (sharkiq docs)
- 更新 sharkiq to use CoordinatorEntity (@bdraco - #39427) (sharkiq docs)
- 更新 iammeter to use CoordinatorEntity (@springstan - #39423) (iammeter docs)
- 更新 accuweather to fully use CoordinatorEntity (@springstan - #39431) (accuweather docs)
- 更新 poolsense to use CoordinatorEntity (@springstan - #39435) (poolsense docs)
- 更新 tesla to use CoordinatorEntity (@springstan - #39436) (tesla docs)
- 更新 stookalert to use DEVICE_CLASS_SAFETY constant (@Mariusthvdb - #39438) (stookalert docs)
- 更新 WLED to use CoordinatorEntity (@springstan - #39442) (wled docs)
- 更新 wolflink to use CoordinatorEntity (@springstan - #39444) (wolflink docs)
- 更新 pi_hole to use CoordinatorEntity (@springstan - #39433) (pi_hole docs)
- 更新 upnp to use CoordinatorEntity (@bdraco - #39434) (upnp docs)
- 更新 toon to use CoordinatorEntity (@springstan - #39441) (toon docs)
- 更新 tankerkoenig to use CoordinatorEntity (@bdraco - #39440) (tankerkoenig docs)
- 更新 tile to use CoordinatorEntity (@springstan - #39439) (tile docs)
- 更新 hue to use CoordinatorEntity (@springstan - #39446) (hue docs)
- Prevent CoordinatorEntity from requesting updates on disabled 实体 (@bdraco - #39452)
- 更新 roku 状态 faster after 动作 (@ctalkington - #39453) (roku docs)
- 更新 meteo_france to use CoordinatorEntity (@springstan - #39432) (meteo_france docs)
- 更新 plugwise to use CoordinatorEntity (@bdraco - #39457) (plugwise docs)
- 更新 notion to use CoordinatorEntity (@bdraco - #39460) (notion docs)
- 更新 coronavirus to use CoordinatorEntity (@springstan - #39449) (coronavirus docs)
- 更新 risco to use CoordinatorEntity (@bdraco - #39456) (risco docs)
- 更新 xknx to 0.13.0 (@marvin-w - #39407) (knx docs)
- 更新 met to use CoordinatorEntity (@bdraco - #39462) (met docs)
- Add bieniu as code owner for shelly (@bieniu - #39467) (shelly docs)
- 更新 coolmaster to use CoordinatorEntity (@bdraco - #39465) (coolmaster docs)
- 更新 dexcom to use CoordinatorEntity (@bdraco - #39464) (dexcom docs)
- 更新 ovo_energy to use CoordinatorEntity (@bdraco - #39459) (ovo_energy docs)
- 更新 control4 to use CoordinatorEntity (@bdraco - #39466) (control4 docs)
- 更新 hunterdouglas_powerview to use CoordinatorEntity (@bdraco - #39463) (hunterdouglas_powerview docs)
- Fix recorder test intermittently failing (@bdraco - #39468) (recorder docs)
- Improve patching in marytts tests (@ctalkington - #39458) (marytts docs)
- Implement code review for nzbget (@ctalkington - #39425) (nzbget docs) (breaking-change)
- Clarify when message come from FCM (@TomBrien - #39455) (mobile_app docs)
- 更新 awair to use CoordinatorEntity (@bdraco - #39469) (awair docs)
- 更新 schluter to use CoordinatorEntity (@bdraco - #39454) (schluter docs)
- Fix 灯光 设备 触发器 test flapping (@bdraco - #39470) (灯光 docs)
- Add 集成 for ProgettiHWSW 自动化 boards (@ArdaSeremet - #37922) (progettihwsw docs) (new-集成)
- 更新 progettihwsw to use CoordinatorEntity (@ctalkington - #39477) (progettihwsw docs)
- Make onvif username optional (@timmo001 - #39415) (onvif docs)
- Apply code review for insteon config flow (@teharris1 - #39171) (insteon docs)
- Ensure patching applies while testing marytts (@ctalkington - #39490) (marytts docs)
- Fix a problem with set_speed(off) when direct HA API for set speed is called (@prystupa - #39488) (bond docs)
- Add cache headers to picture 集成 (@balloob - #39402) (图像 docs)
- 升级 pydocstyle to 5.1.1 (@frenck - #39492)
- Fix oauth2 模板 by updating outdated method name (@timmo001 - #39486)
- 升级 sentry-sdk to 0.17.1 (@frenck - #39495) (sentry docs)
- Allow loading Lovelace 仪表盘 not only from root (@denysdovhan - #37561) (Lovelace docs)
- Detect comments in jinja 模板 (@balloob - #39496)
- Add support for a dedicated 天气 station within KNX (@marvin-w - #39476) (knx docs) (new-platform)
- route53 - support updating base domain (@arunderwood - #39264) (route53 docs)
- Add Xiaomi Miio gateway illuminance 传感器 and gateway 灯光 (@starkillerOG - #37959) (xiaomi_miio docs)
- Skip 设置 of dependencies if they are already 设置 (@bdraco - #39482)
- Add 实体 服务 to the Flo 集成 (@dmulcahey - #38287) (flo docs) (new-集成)
- Fix ADS component by bumping pyads 版本 to 3.2.2 (@stlehmann - #39502) (ads docs)
- Add config flow to yeelight (@shenxn - #37191) (discovery docs) (yeelight docs) (breaking-change)
- Bump gios library to 版本 0.1.3 (@bieniu - #39507) (gios docs)
- Bump dependency to 0.11.0 for HomematicIP Cloud (@SukramJ - #39508) (homematicip_cloud docs)
- 更新 pyrisco to 0.2.4 (@OnFreund - #39521) (risco docs)
- 更新 pyvolumio to 0.1.2 (@OnFreund - #39522) (volumio docs)
- Bump zeroconf to 0.28.3 (@bdraco - #39471) (zeroconf docs)
- 更新 pyvolumio to 0.1.1 (@OnFreund - #39525) (kodi docs)
- Fix kodi codeowners (@bdraco - #39532) (kodi docs)
- Make async_track_template_result track multiple 模板 (@bdraco - #39371) (bayesian docs) (模板 docs) (universal docs) (websocket_api docs)
- Bump yeelight to 0.5.3 (@shenxn - #39542) (yeelight docs)
- Fix outdated api url in noaa_tides (@jdelaney72 - #39370) (noaa_tides docs)
- Adds missing name property to KNX 天气 设备 (@marvin-w - #39547) (knx docs)
- Bump openwrt-luci-rpc 版本: 1.1.3 → 1.1.5 (@fbradyirl - #39545) (luci docs)
- Handle missing values in Shelly 传感器 (@OnFreund - #39515) (shelly docs)
- Fix missing end tag in translation key (@SNoof85 - #39546) (insteon docs)
- Add support for authenticated Shelly 设备 (@OnFreund - #39461) (shelly docs)
- Filter out disconnected Shelly 传感器 (@balloob - #39516) (shelly docs)
- Provide 用户-defined 动作 to app (@TomBrien - #38572) (ios docs)
- Squeezebox 场景 fixes (@rajlaud - #38214) (squeezebox docs) (breaking-change)
- Deprecate manually passing 实体 ids to 模板 实体 (@bdraco - #39382) (模板 docs) (breaking-change)
- Provide compatibility with older Home Assistant 安装. (@jyavenard - #39539) (emulated_hue docs) (breaking-change)
- 更新 pycoolmaster-async to 0.1.1 (@OnFreund - #39551) (coolmaster docs)
- Address open review issues in sharkiq 集成 (@ajmarks - #39504) (sharkiq docs)
- Apply code review on progettihwsw (@ArdaSeremet - #39520) (progettihwsw docs)
- Updated 前端 to 20200901.0 (@bramkragten - #39560) (前端 docs)
- Use media 状态 to better represent roku 状态 (@ctalkington - #39540) (roku docs) (breaking-change)
- Bump openwrt-luci-rpc to 1.1.6 (@fbradyirl - #39561) (luci docs)
- Add shelly overtemp and vibration 传感器 (@chemelli74 - #39556) (shelly docs)
- Add alexa unofficial specific API support for Italian (@paoloantinori - #39475) (alexa docs)
- Add ability to disable the sqlite3 quick_check (@bdraco - #39479) (recorder docs)
- Overcome group concurrent 设置 limitation (@bdraco - #39483) (group docs)
- Undecorate RenderInfo result property (@bdraco - #39108)
- Fix discovery 更新 of MQTT 灯光 (@emontnemery - #39325) (MQTT docs)
- Add Sonos media browser capability (@cgtobi - #39239) (sonos docs)
- Add max_exceeded 日志 level option to 自动化 & 脚本 (@pnbruckner - #39448) (自动化 docs) (脚本 docs)
- Handle Alexa 实体 removed (@balloob - #39569) (alexa docs)
- Remove flaky wol test that didn't test anything (@balloob - #39571) (wake_on_lan docs)
- Syncthru 设备 registry (@scop - #36750) (discovery docs) (syncthru docs)
- Automatically 更新 app list for Vizio SmartTV's (@raman325 - #38641) (vizio docs)
- Add support for receiver and speaker 设备 classes (@elupus - #38381) (google_assistant docs) (媒体播放器 docs)
- Met.no migrate from classic to complete endpoint (@thimic - #39493) (met docs) (breaking-change)
- Fix vizio black formatting (@MartinHjelmare - #39573) (vizio docs)
- Fix some more usages of asynctest (@balloob - #39570)
- Fix UPC ConnectBox logout and 设备 hostnames (@ofalvai - #39568) (upc_connect docs)
- Provide a logbook option entity_matches_only to optimize for single 实体 lookup (@bdraco - #39555) (logbook docs)
- library 版本 升级 to 0.46 (@ziv1234 - #39580) (dynalite docs)
- Remove vizio test assertions for 集成 details in test_init (@raman325 - #39579) (vizio docs)
- Improve Yeelight code (@shenxn - #39543) (yeelight docs)
- Add get_migration_config to zwave websocket api (@cgarwood - #39577) (zwave docs) (new-集成)
- Round 传感器 readings for bom (@springstan - #39513)
- Reintroduce custom met.no url (@Danielhiversen - #39583) (met docs)
- Add Plex 服务 to refresh a library (@jjlawren - #39094) (plex docs)
- Add the ability to 重载 rpi_gpio platforms from yaml (@Misiu - #39548) (rpi_gpio docs)
- Support reloading the group 通知 platform (@bdraco - #39511) (group docs) (通知 docs)
- Support reloading the rest 通知 platform (@bdraco - #39527) (rest docs)
- Support reloading the telegram 通知 platform (@bdraco - #39529) (telegram docs)
- Support reloading the smtp 通知 platform (@bdraco - #39530) (group docs) (通知 docs) (rest docs) (smtp docs)
- Support reloading MQTT yaml 配置 (@bdraco - #39531) (MQTT docs)
- Fix rain retrival for OWM (@Rikorose - #39566) (openweathermap docs)
- Add Recently Added and On Deck to Plex media browser (@jjlawren - #39232) (plex docs)
- Improve tests for GIOS 集成 (@bieniu - #39514) (gios docs)
- Add 服务 to scan for new Plex clients (@jjlawren - #39074) (plex docs)
- Fix wrong 错误 message on adding a new HomematicIP Cloud AP (@SukramJ - #39599) (homematicip_cloud docs)
- Bump hass-nabucasa to 0.36.0 (@balloob - #39603) (cloud docs)
- Add support for Shelly Gas to the Shelly 集成 (@bieniu - #39478) (shelly docs)
- 升级 sentry-sdk to 0.17.3 (@frenck - #39607) (sentry docs)
- 升级 apprise to 0.8.8 (@frenck - #39606) (apprise docs)
- Expose more 属性 in rejseplanen (@DarkFox - #37216) (rejseplanen docs)
- Bump pytradfri to 7.0.0, support multiple gateways (@balloob - #39609) (tradfri docs)
- 更新 aioswitcher to 1.2.1 (@TomerFi - #39614) (switcher_kis docs)
- Add HmIP-STV to HomematicIP Cloud (@SukramJ - #39518) (homematicip_cloud docs)
- Add troubleshooting link to 错误 message for xiaomi_aqara (@starkillerOG - #39617) (xiaomi_aqara docs)
- Address Plex review comments (@jjlawren - #39591) (plex docs)
- Add .well-known/密码-change (@balloob - #39613) (前端 docs) (http docs)
- 重启 keepalive streams (@esev - #38863) (stream docs)
- Use DataUpdateCoordinator for supla (@mwegrzynek - #38921) (supla docs)
- Google assistant openclose (@elupus - #39612) (google_assistant docs)
- Clean tradfri hass data and add tests (@MartinHjelmare - #39620) (tradfri docs)
- fix black for stream (@ctalkington - #39622) (stream docs)
- Use CoordinatorEntity for supla (@ctalkington - #39621) (supla docs)
- Improve mpd media position handling (@ctalkington - #39390) (mpd docs)
- Add as_local convenience function to jinja 模板 (@bdraco - #39618)
- Improve sonarr 传感器 test (@ctalkington - #39623) (sonarr docs)
- Automatically 配置 HTTP auth type in ONVIF snapshots (@OnFreund - #38729) (onvif docs)
- Add 设备 class for roku 设备 (@ctalkington - #39627) (roku docs)
- 更新 DSMR 集成 to import yaml to ConfigEntry (@RobBie1221 - #39473) (dsmr docs)
- Add 设备 class to directv 设备 (@ctalkington - #39628) (directv docs) (directv docs)
- Add radio channel 属性 to Sonos (@amelchio - #39631) (sonos docs)
- Add tests for Broadlink 遥控器 (@felipediel - #39235) (broadlink docs)
- Bump nexia to 0.9.4 (@bdraco - #39634) (nexia docs)
- Improve broadlink 传感器 tests (@ctalkington - #39632) (broadlink docs)
- Add support for VeSync 风扇 (@TheGardenMonkey - #36132) (vesync docs) (new-platform)
- Fix Spotify scopes validation for re-auth (@frenck - #39638) (spotify docs)
- 升级 isort to 5.5.0 (@frenck - #39639) (sense docs)
- Add new Plex movie lookup method for 媒体播放器.play_media (@jjlawren - #39584) (plex docs)
- 升级 wled to 0.4.4 (@frenck - #39641) (wled docs)
- Fix 传感器 without unit 属性 in Shelly 集成 (@bieniu - #39629) (shelly docs)
- Add payload to 调试 output of rest_command (@hmmbob - #39190) (rest_command docs)
- Make resilient to 错误 while receiving SMS (@ocalvo - #37577) (sms docs)
- Allow using environment cacert file (@bjornsnoen - #38816)
- Add devolo thermostat 设备 (@2Fake - #38594) (devolo_home_control docs) (new-platform)
- Fix missing assert in 模板 test (@bdraco - #39648)
- Add some missing 传感器 for Shelly 集成 (@bieniu - #39651) (shelly docs)
- Reduce 日志 level for Plex 服务 call (@jjlawren - #39647) (plex docs)
- Do not treat nexia http not found as invalid auth (@bdraco - #39484) (nexia docs)
- Allow separate URL for REST 开关 状态 (@jjlawren - #39557) (rest docs)
- Media Source implementation for Chromecast (@hunterjm - #39305) (cast docs) (default_config docs) (media_finder docs) (new-集成)
- Bump brother library (@bieniu - #39657) (brother docs)
- Add unique ID to demo 风扇 (@kbickar - #39658) (demo docs)
- Improve handling of roon radio data (@pavoni - #39659) (roon docs)
- Add Netatmo media browser support (@cgtobi - #39578) (cast docs) (default_config docs) (media_source docs) (netatmo docs) (new-集成)
- Bumping aioasuswrt 版本 so that it have license-tag and manifest (@kennedyshead - #39654) (asuswrt docs)
- Address review comments on dsmr 更新 to ConfigEntry (@RobBie1221 - #39662) (dsmr docs)
- Use the shared Zeroconf instance in esphome (@bdraco - #38747) (esphome docs)
- Add event 传感器 for risco (@OnFreund - #39594) (risco docs) (new-platform)
- Prevent mpchc from spamming 日志 (@ctalkington - #39663) (mpchc docs)
- Improve ozw websocket response when node is not found (@cgarwood - #39653) (ozw docs)
- Replace old source prefixing for channels with new media browser (@elupus - #39596) (philips_js docs)
- Refactor sharkiq tests (@ajmarks - #39564) (sharkiq docs)
- Add mac address to sky_hub tracker (@RogerSelwyn - #39506) (sky_hub docs)
- Updated 前端 to 20200904.0 (@bramkragten - #39665) (前端 docs)
- Register media browser 面板 (@hunterjm - #39655) (media_source docs)
- Bump gios library (@bieniu - #39669) (gios docs)
- Bump accuweather library (@bieniu - #39667) (accuweather docs)
- Add OpenWeatherMap config_flow (@freekode - #34659) (openweathermap docs) (breaking-change)
- Improve systemmonitor (@spacegaier - #36283) (systemmonitor docs)
- Add parameters for enabling Auth in Apache Kafka 集成 (@inishchith - #39611) (apache_kafka docs)
- Add connection validation on import for dsmr 集成 (@RobBie1221 - #39664) (dsmr docs)
- Add Emulated Kasa 集成 (@kbickar - #39630) (emulated_kasa docs) (sense docs) (new-集成)
- Fix monoprice option flow test (@MartinHjelmare - #39685) (monoprice docs)
- Add iSmartGate support (@vangorra - #39437) (gogogate2 docs)
- Fix for starline authorization (@Funcy-dcm - #39674) (starline docs)
- Drop UNIT_ prefix for percentage constant (@springstan - #39383)
- Use more homeassistant constants in NWS (@MatthewFlamm - #39690) (nws docs)
- Match 文档 on expose being default True (@elupus - #39692) (google_assistant docs)
- Add tradfri api call 错误 handling (@MartinHjelmare - #39681) (tradfri docs)
- Add Arcam radio media browsing (@elupus - #39593) (arcam_fmj docs)
- Improve handling of DHCP 设备 (@chemelli74 - #39683) (shelly docs)
- Bump pytradfri to 7.0.1 (@MartinHjelmare - #39696) (tradfri docs)
- 升级 TensorFlow to 2.3 (@hunterjm - #39673) (tensorflow docs)
- Mock tradfri 灯光 correctly (@MartinHjelmare - #39706) (tradfri docs)
- Bump pytradfri to 7.0.2 (@MartinHjelmare - #39707) (tradfri docs)
- Add media browser support to roku (@ctalkington - #39652) (roku docs)
- Browse media class (@balloob - #39698) (arcam_fmj docs) (媒体播放器 docs) (media_source docs) (netatmo docs) (philips_js docs) (plex docs) (roku docs) (sonos docs) (spotify docs)
- Make multi-开关 设备 a single 设备 with 2 开关 (@chemelli74 - #39689) (shelly docs)
- Time 条件 can also accept an input_datetime 实体 ID (@frenck - #39676)
- Add shorthand notation for 模板 条件 (@frenck - #39705) (自动化 docs)
- 更新 py-melissa-温控 to 2.1.4 (@kennedyshead - #39708) (melissa docs)
- Bump aioshelly library to 0.3.0 (@bieniu - #39716) (shelly docs)
- Add HomeKit discovery for iSmartGate (@bdraco - #39702) (gogogate2 docs)
- Numeric 状态 条件 can also accept input_number 实体 ID (@frenck - #39680)
- Set 日志 level for libav.mp4 in stream (@uvjustin - #39719) (stream docs)
- Add number parsing for OpenHardwareMonitor (@fillefilip8 - #39030) (openhardwaremonitor docs) (breaking-change)
- 更新 ZHA storage every 10 minutes (@dmulcahey - #39710) (zha docs)
- Add Plugwise scan_interval config option (@bouwew - #37229) (plugwise docs)
- Bump zeroconf to resolve a performance issue with the cache reaper (@bdraco - #39713) (zeroconf docs)
- Fix media browser 面板 title (@spacegaier - #39720) (media_source docs)
- Fix 设置 of ONVIF 设备 without snapshot capability (@scop - #39723) (onvif docs)
- Spotify browser add more sources (@bramkragten - #39296) (媒体播放器 docs) (spotify docs)
- Add domain filter support to async_all to match async_entity_ids (@bdraco - #39725) (加湿器 docs) (灯光 docs) (owntracks docs)
- Axis - Improve naming of some events (@Kane610 - #39699) (axis docs) (breaking-change)
- Add hassfest requirements validation (@MartinHjelmare - #39329)
- Fix some missing ozw 传感器 (@firstof9 - #39686) (ozw docs)
- 状态 条件 can also accept an input_* 实体 ID as 状态 value (@frenck - #39691)
- allow creating directories from 摄像头 snapshot, stream record, and tensorflow file out (@hunterjm - #39728) (摄像头 docs) (stream docs) (tensorflow docs)
- Set DEVICE_CLASS_GATE for iSmartGate gates (@bdraco - #39703) (gogogate2 docs)
- Add unique_id to jewish_calendar 实体 (@ajmarks - #39025) (jewish_calendar docs)
- Improve 温控 support for fibaro (@pbalogh77 - #39038) (fibaro docs)
- Fix handling of 设备 registry defaults (@emontnemery - #39688)
- 更新 ZHA dependencies (@Adminiuga - #39700) (zha docs)
- Remove ozw 门锁 服务 for loops, replace with get_value() (@firstof9 - #39735) (ozw docs)
- Optimize 模板 sandbox for Home Assistant (@bdraco - #39731)
- Bump pyskyqhub to 0.1.3 (@RogerSelwyn - #39739) (sky_hub docs)
- 升级 isort to 5.5.1 (@frenck - #39737)
- Make Sonos use BrowseMedia (@cgtobi - #39742) (sonos docs)
- Bump Plugwise_Smile from 1.1.0 to 1.4.0 (@CoMPaTech - #39726) (plugwise docs)
- Fix cast media player browser (@bramkragten - #39745) (cast docs)
- Rework Shelly 传感器 (@balloob - #39747) (shelly docs)
- Improve Plugwise config_options testing (@CoMPaTech - #39736) (plugwise docs)
- Add devolo current and total consumption to 传感器 (@2Fake - #38386) (devolo_home_control docs)
- Add devolo 遥控器 设备 as 二元sensor (@2Fake - #39105) (devolo_home_control docs)
- Add 设备 动作 support for 遥控器 (@ctalkington - #39400) (遥控器 docs)
- Support 状态 触发器 with from/for but no to (@amelchio - #39480) (homeassistant docs)
- Retry tado 设置 later when cloud 服务 is unavailable (@bdraco - #39748) (tado docs)
- Support 'for' without setting the 'to'-状态 in 自动化 状态 触发器 (@frenck - #39730) (homeassistant docs)
- Fix netatmo browse_media return type (@MartinHjelmare - #39751) (netatmo docs)
- Ensure static 模板 are still called back on first refresh (@bdraco - #39753)
- Support color temperature (@Misiu - #39743) (shelly docs)
- Increase test coverage for 模板 sandbox (@bdraco - #39750)
- Make Spotify library payload use "BrowseMedia" (@spacegaier - #39744) (spotify docs)
- Remove remaining and add finishes_at 属性 from timer (@IcyPalm - #37519) (timer docs) (breaking-change)
- Add Kodi media browser support (@cgtobi - #39729) (kodi docs)
- Timer make 属性 format always h:mm:ss (@bramkragten - #38292) (timer docs) (breaking-change)
- 更新 pykodi to 0.1.2 (@OnFreund - #39758) (kodi docs)
- Add missing MENU option for webos.按钮 服务 (@basnijholt - #39746) (webostv docs)
- Don't poll 实体 for unavailable ZHA 设备 (@dmulcahey - #39756) (zha docs)
- Local media source: return different 错误 if media folder doesnt exist (@bramkragten - #39759) (media_source docs)
- Force token expires_in to float (@timmo001 - #39489)
- 更新 前端 to 20200907.0 (@bramkragten - #39761) (前端 docs)
- Clean up spotify media browser dict access (@MartinHjelmare - #39764) (spotify docs)
- Fix plex browse media (@MartinHjelmare - #39766) (plex docs)
- Support shelly 遮盖(roller) mode (@chemelli74 - #39711) (shelly docs) (beta fix) (new-platform)
- Guard for spotify items without type (@balloob - #39795) (spotify docs) (beta fix)
- Add media class browse media 属性 (@MartinHjelmare - #39770) (beta fix)
- Add the ability to 重载 bayesian platforms from yaml (@bdraco - #39771) (bayesian docs) (beta fix)
- Remove invalidation 版本 from panel_custom (@frenck - #39782) (panel_custom docs) (beta fix)
- 恢复 miflora now that v0.7.0 is out (@basnijholt - #39787) (miflora docs) (beta fix)
- Fix Sonos issue (@cgtobi - #39790) (sonos docs) (beta fix)
- Copy instead of deepcopy the variables in a wait for 触发器 (@balloob - #39796) (beta fix)
- Some shelly fixes (@balloob - #39798) (shelly docs) (beta fix)
- Remove HTML support from 前端 (@balloob - #39799) (前端 docs) (breaking-change) (beta fix)
- Remove deprecated Hue 配置 (@frenck - #39800) (hue docs) (beta fix)
- Bump pydelijn to 0.6.1 (@Emilv2 - #39802) (delijn docs) (beta fix)
- Fix 遮盖 模板 实体 honoring titlecase True/False (@bdraco - #39803) (模板 docs) (beta fix)
- 恢复 missing device_class to 模板 binary_sensor (@bdraco - #39805) (模板 docs) (beta fix)
- Fix isy994 send_node_command (@bdraco - #39806) (isy994 docs) (beta fix)
- Fix MQTT 灯光 value 模板 (@emontnemery - #39820) (MQTT docs) (beta fix)
- 更新 前端 to 20200908.0 (@bramkragten - #39824) (前端 docs) (beta fix)
- Avoid failing when hub does not provide 遮盖 position information (@Franchie - #39826) (hunterdouglas_powerview docs) (beta fix)
- Add missing 传感器 after reworking 传感器 platform in Shelly 集成 (@bieniu - #39765) (shelly docs) (beta fix)
- Fix Kodi media browser (@cgtobi - #39829) (kodi docs) (beta fix)
- Fix nzbget 传感器 (@ctalkington - #39833) (nzbget docs) (beta fix)
- Fix Kodi media browser (@cgtobi - #39840) (kodi docs) (beta fix)
- Make spotify media class lookup more robust (@MartinHjelmare - #39841) (spotify docs) (beta fix)
- Use correct URL for Fitbit callbacks (@colinfrei - #39823) (fitbit docs) (beta fix)
- Use a unique id for each icmplib ping to avoid mixing unrelated responses (@bdraco - #39830) (ping docs) (beta fix)
- Updated warning_device_warn (@martin3000 - #39851) (zha docs) (beta fix)
- Sort Local Media Source and fix media class (@hunterjm - #39858) (media_source docs) (beta fix)
- 更新 ZHA dependency (@Adminiuga - #39862) (zha docs) (beta fix)
- Remove media class apps and channels (@MartinHjelmare - #39864) (媒体播放器 docs) (media_source docs) (philips_js docs) (roku docs) (beta fix)
- Improve Roku media browser structure (@ctalkington - #39754) (roku docs) (beta fix)
- Add exception for NoURLAvailableError in OAuth2FlowHandler (@ludeeus - #39845) (spotify docs) (beta fix)
- 安装 stdlib-list in 脚本/bootstrap (@balloob - #39866) (beta fix)
- Disable Met.no hourly 天气 by default (@frenck - #39867) (met docs) (beta fix)
- Updated 前端 to 20200909.0 (@ludeeus - #39869) (前端 docs) (beta fix)
- Bump pysmappee to 0.2.13 (@bsmappee - #39883) (smappee docs) (beta fix)
- Fix event 触发器 (@balloob - #39884) (homeassistant docs) (beta fix)
- Bump hass-nabucasa 0.37.0 (@pvizeli - #39885) (cloud docs) (beta fix)
- Shelly 开关 to guard for shelly 2 in roller mode (@balloob - #39886) (shelly docs) (beta fix)
- Fix spotify media browser category (@bramkragten - #39888) (spotify docs) (beta fix)
- Fix issue with grpcio build on 32bit arch (@pvizeli - #39893) (beta fix)
- Add default variables to 脚本 助手 (@balloob - #39895) (自动化 docs) (脚本 docs) (beta fix)
- Detect self-referencing loops in 模板 实体 and 日志 a 警告 (@bdraco - #39897) (模板 docs) (beta fix)
- Fix ping 日志 level to be 调试 instead of 警告 (@bdraco - #39900) (ping docs) (beta fix)
- Fix discovery 更新 of MQTT 状态 模板 (@emontnemery - #39901) (MQTT docs) (beta fix)
- Limit zeroconf discovery to name/macaddress when provided (@bdraco - #39877) (axis docs) (brother docs) (doorbird docs) (shelly docs) (smappee docs) (zeroconf docs) (beta fix)
- Warn 用户 if KNX has no 设备 configured (@marvin-w - #39899) (knx docs) (beta fix)
- Add children media class (@MartinHjelmare - #39902) (beta fix)
- Disable audio for HLS or mpegts input (@uvjustin - #39906) (stream docs) (beta fix)
- Don't 触发器 on 属性 when the 属性 doesn't change (@basnijholt - #39910) (homeassistant docs) (beta fix)
- Extract variable rendering (@balloob - #39934) (自动化 docs) (脚本 docs) (beta fix)
- Set variable values in 脚本 (@thomasloven - #39915) (beta fix)
- Bump aioshelly to 0.3.1 (@balloob - #39917) (shelly docs) (beta fix)
- Prevent missing 集成 from failing HomeKit startup (@bdraco - #39918) (homekit docs) (beta fix)
- 更新 zeroconf to 0.28.5 (@bdraco - #39923) (zeroconf docs) (beta fix)
- Accept known hosts for get_url for OAuth (@frenck - #39936) (beta fix)
- Handle Kodi shutdown (@OnFreund - #39856) (kodi docs) (beta fix)
- Bump pyloopenergy library to 0.2.1 (@pavoni - #39919) (loopenergy docs) (beta fix)
- Return the listeners with the 模板 result for the websocket api (@bdraco - #39925) (websocket_api docs) (beta fix)
- Fix missing position 属性 for MeteoFranceAlertSensor (@Quentame - #39938) (meteo_france docs) (beta fix)
- Change 模板 loop detection strategy to allow self-referencing updates when there are multiple 模板 (@bdraco - #39943) (模板 docs) (beta fix)
- Set output timescale to input timescale (@uvjustin - #39946) (stream docs) (beta fix)
- Add children media class to children spotify media browser (@bramkragten - #39953) (spotify docs) (beta fix)
- Remove skip_sidx 容器 option in stream (@uvjustin - #39970) (stream docs) (beta fix)
- Fix children_media_class for special folders (@jjlawren - #39974) (plex docs) (beta fix)
- Bump 前端 to 20200912.0 (@ludeeus - #39997) (前端 docs) (beta fix)
- Bump androidtv to 0.0.50 (@JeffLIrion - #39998) (androidtv docs) (beta fix)
- Fix Freebox call 传感器 when no call in history (@Quentame - #40001) (freebox docs) (beta fix)
- Bump pyhaversion to 3.4.0 (@ludeeus - #40016) (版本 docs) (beta fix)
- Suppress homekit bridge discovery by homekit controller (@bdraco - #39990) (homekit_controller docs) (beta fix)
- Fix requiring username or 密码 for nzbget yaml config (@springstan - #40003) (nzbget docs) (beta fix)
- Add tests for Plugwise 集成 (@CoMPaTech - #36371) (plugwise docs) (beta fix)
- Ensure Plugwise unique_id is correctly set (@bouwew - #40014) (plugwise docs) (beta fix)
- Improve handling of mireds being far out of spec (@Kane610 - #40018) (deconz docs) (beta fix)
- Do not 日志 an 错误 when a host is unreachable while pinging (@bdraco - #40024) (ping docs) (beta fix)
- Fix slack 通知 requiring an icon (@springstan - #40027) (slack docs) (beta fix)
- Ensure homekit_controller traps exceptions from find_ip_by_device_id (@bdraco - #40030) (homekit_controller docs) (beta fix)
- Fix 实体 extraction from 模板 条件 (@frenck - #40034) (beta fix)
- Speedtestdotnet - use server name to generate server list (@r4nd0mbr1ck - #39775) (speedtestdotnet docs) (beta fix)
- 更新 gogogate2-api to 2.0.2 (@bdraco - #40010) (gogogate2 docs) (beta fix)
- Fix ecobee 天气 forcast off by 1 bug (@b3nj1 - #40048) (ecobee docs) (beta fix)
- Correct devolo 温控 设备 (@2Fake - #40061) (devolo_home_control docs) (beta fix)
- Fix default forecast mode OpenWeatherMap (@freekode - #40062) (openweathermap docs) (beta fix)
- Bump aiohomekit 版本 (regression fix) (@Jc2k - #40064) (homekit_controller docs) (beta fix)
- 更新 Docker base 图像 to 8.4.0 (@pvizeli - #40066) (beta fix)
- Fix tag last scanned serialization (@balloob - #40067) (tag docs) (beta fix)
- Fix netatmo media browser of outdoor events (@cgtobi - #40079) (netatmo docs) (beta fix)
- Increase TIMEOUT_ACK to 2s (@emontnemery - #40080) (MQTT docs) (beta fix)
- 更新 ZHA dependency (@Adminiuga - #40083) (zha docs) (beta fix)
- Check Sonos for local library before browsing (@cgtobi - #40085) (sonos docs) (beta fix)
- Convert color temperature to hue and saturation for HomeKit (@bdraco - #40089) (homekit docs) (beta fix)
- 更新 前端 to 20200915.0 (@bramkragten - #40101) (前端 docs) (beta fix)
- Address 错误 in SQL query (@dgomes - #39939) (sql docs) (beta fix)
- Add media dirs 核心 配置 (@frenck - #40071) (media_source docs) (breaking-change) (beta fix)
- Guard both Shelly 2 & Shelly 2.5 in roller mode (@thecode - #40086) (shelly docs) (beta fix)
- Remove the unnecessary prefix from the 传感器 names in the Shelly 集成 (@bieniu - #40097) (shelly docs) (beta fix)
- Increase TIMEOUT_ACK to 10s (@springstan - #40117) (MQTT docs) (beta fix)
- Bump aioshelly library to 版本 0.3.2 (@bieniu - #40118) (shelly docs) (beta fix)
- Allow ESPHome to 触发器 the HA tag scanned event (@jesserockz - #40128) (esphome docs) (beta fix)
- Use 设备 name stored in device_info for tag scan in ESPHome (@jesserockz - #40130) (esphome docs) (beta fix)
- Guard for when Yandex Transport data fetching fails (@balloob - #40131) (yandex_transport docs) (beta fix)
- Fix ESPHome scan tag 设备 ID (@balloob - #40132) (esphome docs) (beta fix)
- Fix 场景 validator (@balloob - #40140) (homeassistant docs) (beta fix)
- Fix missing f from f-strings in cast 集成 (@frenck - #40144) (cast docs) (beta fix)
- Fix local media browser source conflicting with local www folder (@frenck - #40151) (media_source docs) (beta fix)
- 更新 前端 to 20200916.0 (@bramkragten - #40153) (前端 docs) (beta fix)
- Check mpd time type before splitting it (@ctalkington - #40139) (mpd docs) (beta fix)
- Fix luci device_tracker not reliably reporting home/away 状态 (@cagnulein - #40160) (luci docs) (beta fix)
- 更新 pyhaversion to 3.4.2 (@ludeeus - #40161) (版本 docs) (beta fix)
- Updated 前端 to 20200917.1 (@bramkragten - #40170) (前端 docs) (beta fix)
- Fix editing tags only get isoformat from datetime (@bramkragten - #40174) (tag docs) (beta fix)
- Add missing conext preservation to bayesian and universal (@bdraco - #40178) (bayesian docs) (universal docs) (beta fix)