

WLED
WLED 是一个快速且功能丰富的 ESP8266/ESP32 Web 服务器实现,用于控制 NeoPixel LED(如 WS2812B、WS2811、SK6812 等)以及基于 SPI 的芯片组(如 WS2801 和 APA102)。
使用场景
WLED 可以通过多种方式增强您的家庭自动化:
- 环境灯光效果:创建可对音乐、时间或家中事件做出响应的动态灯光场景,为房间营造氛围
- 状态指示:使用不同颜色和效果来可视化信息,例如显示 Home Assistant 状态、即将到来的天气变化或日历事件
- 娱乐和游戏:在观影、游戏或聚会时,通过同步效果和颜色变化来控制灯带
- 节能氛围照明:用节能灯带替代传统氛围灯,同时保持完整的控制与自动化能力
- 智能家居通知:在门铃响起或安全警报等重要事件发生时,触发特定灯光效果以提供可视提醒
前提条件
:::important 此集成要求 WLED 设备运行 WLED 0.14.0 或更高版本。
::: 您可以访问 WLED web installer 在设备上安装最新版 WLED,或从 WLED GitHub releases page 下载最新版本。
此集成可通过 UI 配置。前往 设置 > 设备与服务 添加。
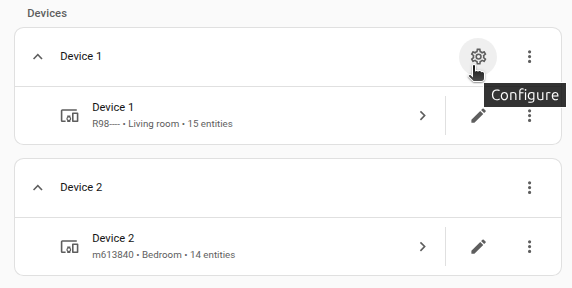
Options
To define options for WLED, follow these steps:
-
In Home Assistant, go to Settings > Devices & services.
-
If multiple instances of WLED are configured, choose the instance you want to configure.
-
On the card, select the cogwheel
. - If the card does not have a cogwheel, the integration does not support options for this device.
-
Edit the options, then select Submit to save the changes.
支持的功能
WLED 集成提供以下实体。
灯光
此集成会将 WLED 设备作为灯光添加到 Home Assistant 中。 Home Assistant 会将灯带的每个分段视为单独的灯光实体。
仅支持 Home Assistant 灯光实体原生支持的功能(包括效果)。
使用 WLED 分段
WLED 可以将一条灯带拆分为多个分段。这些分段既可以在 WLED 中分别控制,也可以在 Home Assistant 中分别控制。
If WLED has 1 segment defined (the default), that one segment controls the whole LED strip. Home Assistant creates a single light entity to control the strip.
If WLED has 2 or more segments, each segment gets its own light entity in Home Assistant. Additionally, a master light entity is created. This master entity controls the strip power and overall brightness applied to all segments.
Additionally, select, number, and switch entities described below will be created for each segment.
选择实体
This integration provides select entities for the following information from WLED:
- Live override: Controls how WLED handles incoming real-time data (off, on, or until device restarts).
- Playlist: Activates a playlist configured on the WLED device.
- Preset: Activates a preset configured on the WLED device.
- Color palette (per segment): Selects the color palette used by the current effect.
数值实体
This integration provides number entities to control the following, segment-specific settings:
- Intensity
- Speed
传感器
This integration provides sensor entities for the following information from WLED:
- Estimated current (in mA, only when a automatic brightness limiter is configured on the device)
- Max current (in mA, only when a automatic brightness limiter is configured on the device)
- LED count
- Uptime (disabled by default)
- Free memory (in bytes, disabled by default)
- Wi-Fi Signal Strength (in %, disabled by default)
- Wi-Fi Signal Strength (RSSI in dBm, disabled by default)
- Wi-Fi Channel (disabled by default)
- Wi-Fi BSSID (disabled by default)
- IP Address
开关
The integration will also create a number of switch entities.
Nightlight
Toggles the WLED nightlight feature, which gradually dims the lights over a configurable duration.
Can be configured on the WLED itself under Settings > LED Preferences > Timed light.
Sync receive and sync send
Toggles the synchronization between multiple WLED devices. Can be configured on the WLED itself under Settings > Sync Interfaces > WLED Broadcast.
Reverse
Reverses the direction of the LED effect on a segment. One switch is created per segment.
按钮
This integration provides a button entity to restart the WLED device.
更新
The integration has an update entity that provides information on the latest available version of WLED and indicates if a firmware update is available for installation.
The firmware update can be triggered and installed onto your WLED device directly from Home Assistant.
The update entity will only provide updates to stable versions, unless you are using a beta version of WLED. In that case, the update entity will also provide updates to newer beta versions.
数据更新
默认情况下,官方 WLED 固件会启用 WebSocket 服务器,使此集成能够直接从设备接收实时更新(“推送”数据)。
When the integration starts, it first tries to connect by using WebSocket. If the device firmware does not support WebSockets, like a custom WLED build compiled without that feature, the integration automatically falls back to polling and fetches data every 10 seconds by default. Information about new WLED releases is checked independently, once every 3 hours, regardless of the number of connected devices.
已知限制
-
WLED exposes a single color model per segment in Home Assistant. This means that mixed-type LED strips — for example RGB + CCT or RGBW + CCT combinations — cannot currently have their RGB and CCT channels controlled independently in Home Assistant. When such strips are used, only one color temperature or hue is active at a time.
-
The integration relies on the WLED JSON API. Custom WLED builds that disable or remove parts of the API, such as turning off the JSON interface in favor of HTTP + MQTT only, are not supported.
-
Real-time effects that depend on sound-reactive or 2D matrix features appear in the effect list, but may not behave correctly if the WLED instance was not compiled with those capabilities.
-
Custom palettes uploaded to the WLED device (JSON files named
palette0.jsonthroughpalette9.json) are not supported by the integration. Only the built-in palettes are available in the color palette select entity. -
Custom segment names configured in WLED are not used by the integration. Segments are always named using their index (for example, "Segment 1", "Segment 2"), regardless of any names assigned in the WLED interface.
-
The integration does not support controlling WLED usermods, such as the AudioReactive usermod. Features like toggling the microphone on or off are not available.
-
There is no segment master control to apply changes (color, effect, brightness) to all segments in a single action. To control multiple segments at once, you can group them using a light group, though this sends separate requests per segment and may result in less smooth transitions compared to WLED's native multi-segment control.
支持的设备
The integration requires WLED version 0.14.0 or newer. Official WLED releases for ESP8266 and ESP32 are fully supported.
Most standard digital LED chipsets supported by WLED—such as WS2812B, WS2811, SK6812, APA102, or WS2801—work correctly with all features exposed in Home Assistant.
Some LED configurations, however, have limited functionality:
- Analog RGB + CCT or digital RGBCCT strips, such as WS2508 or hybrid RGB + CCT setups, cannot be controlled with separate sliders for color and color temperature. Home Assistant can only manage one color model at a time.
自动化示例
激活随机效果
您可以使用如下操作来自动切换效果:
建议选择与您 WLED 设备能力匹配的效果(例如 1D、2D 或声音响应)。您可以参考 WLED effect list 查看可用选项。确认兼容效果后,您可以基于其 ID 进行随机选择。
Below is an example of how to select a random effect with an ID between 1 and 117, excluding retired effects:
激活随机调色板
Activating a random palette is very similar to the above random effect, and can be done by selecting a random one from the available palette select entity.
激活预设
Activating a preset is an easy way to set a WLED light to a specific configuration. Here is an example action to set a WLED light to a preset called My Preset:
When a preset is activated and the light state is modified afterward
(e.g. with a light.turn_on action), the preset may be reset to an empty value.
This can affect services such as select.select_next, which will start again
from the first option instead of continuing the cycle.
使用指定调色板名称的自动化
An automation to turn on a WLED light and select a specific palette and
set intensity, and speed can be created by first calling the light.turn_on
action, then calling the select.select_option action to select the
palette, then call the number.set_value action to set the intensity
and again to set the speed.
Here is an example of all of these put together into an automation:
故障排除
因 MAC 地址不匹配而导致设备设置失败
症状
"Failed to set up: MAC address does not match the configured device. Expected to connect to device with MAC: XX:XX:XX:XX:XX:01, but connected to device with MAC: XX:XX:XX:XX:XX:02."
When setting up or loading the integration, Home Assistant reports that the MAC address of the connected device does not match the MAC address stored in the configuration.
说明
This error indicates that Home Assistant connected to a different device than expected while using the same IP address.
The most common cause is DHCP address reuse. This usually happens when:
- The original device was offline or temporarily disconnected.
- The router reassigned its IP address to another device.
- Home Assistant attempted to connect to the old IP address and reached a different device with a different MAC address.
To avoid controlling or communicating with the wrong device, the integration validates the MAC address and stops the setup if it does not match the configured one.
解决方法
To resolve this issue, follow these steps:
- Open the integration settings in Home Assistant.
- Select Reconfigure from the menu of the affected integration.
- Verify the currently configured IP address.
- Enter the correct IP address of the device if it has changed.
- Submit the form to update the configuration.
If you are unsure about the correct IP address, you can try the following:
- Check your router or DHCP server for the device's current IP assignment.
- Ensure the IP address matches the device you are configuring.
To reduce the chance of this issue happening again, you can:
- Configure a DHCP reservation for the device in your router.
- Assign a static IP address to the device. In many cases, this issue resolves automatically. When Home Assistant discovers the device at a new IP address, the integration may update the configuration on its own and restore the connection without manual action.
If the error persists, reconfiguring the integration with the correct IP address is required.
Removing the integration
This integration follows standard integration removal. No extra steps are required.
To remove an integration instance from Home Assistant
- Go to Settings > Devices & services and select the integration card.
- From the list of devices, select the integration instance you want to remove.
- Next to the entry, select the three-dot
menu. Then, select Delete.