

Google Assistant SDK
Google Assistant SDK 集成允许 Home Assistant 与 Google Assistant 交互。如果你希望使用 Google Assistant(例如通过手机或 Google Home 设备)来控制 Home Assistant 管理的设备,那么你需要使用 Google Assistant 集成。
此集成支持:
- 发送文本指令给 Google Assistant,以控制 Google Assistant 支持但 Home Assistant 不支持的设备。示例:
- Start vacuuming
- Stream front door on living room TV
- Turn off kitchen TV
- Play rain sounds on bedroom speaker
- 向 Google Assistant 音箱和显示设备广播消息,而不会打断音乐或视频播放。示例:
- Coffee is ready
- Someone is at the front door
- Smoke detected in the master bedroom
- Water leak detected in the master bathroom
- 在任意媒体播放器上播放 Google Assistant 对任意查询的语音回复。示例:
- Tell me a joke
- Say the ABC
- Sing happy birthday
- What does the elephant say?
- 通过 conversation 集成,使用文本或语音与 Google Assistant 进行对话。
前提条件
你需要配置开发者凭据,以允许 Home Assistant 访问你的 Google 账户。 这些凭据与 Nest、Google Sheets、YouTube 和 Google Mail 使用的是同一类凭据。
场景 1:你已经有凭据
这种情况下,你只需要启用 API:
- 前往 Google Developers Console 的 Google Assistant API 页面。
- 确认项目后,为该 API 选择 Enable。
- 继续按照配置部分中的步骤进行。
场景 2:你还没有设置凭据
这种情况下,你需要先生成客户端密钥:
生成客户端 ID 和客户端密钥
本节说明如何在 Google Developers Console 中生成客户端 ID 和客户端密钥。
- 首先,前往 Google Developers Console 启用 Google Assistant API。
- 选择 Create project,输入项目名称,然后选择 Create。
- 启用 Google Assistant API。
- 前往 APIs & Services > Credentials。
- 在左侧边栏中选择 OAuth consent screen。
- 完成应用信息并创建同意屏幕。
- 在 Publishing status > Testing 下,选择 Publish app。
- 在左侧边栏中选择 Clients,并创建一个 Web application 类型的客户端。
- 将
https://my.home-assistant.io/redirect/oauth添加到 Authorized redirect URIs,然后选择 Create。 - 在关闭对话框前,复制 Client ID 和 Client Secret。
此集成可通过 UI 配置。前往 设置 > 设备与服务 添加。
接下来,集成设置流程会引导你填写 应用凭据(OAuth Client ID 与 Client Secret),并授权 Home Assistant 访问你的 Google Assistant API。
授权步骤
-
继续完成选择要授权账户的步骤。
-
如果您的 Google 账户设置为 SDK 不支持的语言(可通过 Google 授权页面显示为该语言判断),授权会失败且不会给出明确错误。将错误页面底部的语言切换为 SDK 支持 的语言后,即可继续进入 Home Assistant 的关联页面。
:::note 您可能会看到一条提示,说明该应用尚未通过验证,您需要确认后才能继续。
::: 3. 此时您会看到正在授权 Home Assistant 访问的内容详情,页面底部有两个选项。请选择 Continue。
-
页面现在会显示 Link account to Home Assistant?,请注意其中的 Your instance URL。如果这里不正确,请参阅 My Home Assistant。确认无误后,选择 Link Account。
-
您现在可以关闭窗口并返回 Home Assistant,此时应能看到来自 Home Assistant 的 Success! 消息。
启用个性化结果(高级用户)
本指南说明如何启用个性化命令,例如“提醒我明晚 9 点去倒垃圾”。
本指南仅适用于高级用户。你需要创建桌面应用类型的 OAuth 客户端 ID,在桌面或笔记本电脑上运行 Python 程序,将生成的凭据复制到 Home Assistant 配置文件中,并且很可能还需要运行 Android 模拟器。
前提条件
- 已成功安装 Google Assistant 集成。
创建凭据
- 前往 Google Developers Console > Credentials。
- 在左上角下拉菜单中选择你之前创建的项目。
- 选择 Create credentials(页面顶部),然后选择 OAuth client ID。
- 将 Application type 设为 Desktop app,并为这组凭据命名(例如 “Home Assistant Desktop Credentials”)。
- 选择 Create。
- 在 OAuth 客户端创建成功的页面中,选择 Download JSON。
- 将下载的文件重命名为
client_secret.json。 - 在你的 Windows、Linux 或 Mac 设备上,如果尚未安装 Python,请先下载安装。
- 打开终端(在 Windows 上,选择 Start,然后输入
cmd)。 - 在终端中运行以下命令(最好在 Python 虚拟环境中执行):
python -m pip install --upgrade google-auth-oauthlib[tool]
- Under Windows:
google-oauthlib-tool --scope https://www.googleapis.com/auth/assistant-sdk-prototype --scope https://www.googleapis.com/auth/gcm --save --client-secrets %userprofile%\Downloads\client_secret.json - Under Linux:
google-oauthlib-tool --scope https://www.googleapis.com/auth/assistant-sdk-prototype --scope https://www.googleapis.com/auth/gcm --save --client-secrets ~/Downloads/client_secret.json - 结果:浏览器会打开一个窗口,要求你选择用于继续访问之前所创建云项目的账户。
- 选中正确的账户后,勾选以下两个复选框:
- Use your Google Assistant: broad access to your Google account
- Send information to your Android device
- 选择 Continue。
- 结果:如果一切顺利,浏览器中会显示 The authentication flow has completed. You may close this window 消息。
- 终端中会显示凭据保存的路径。例如:
credentials saved: C:\Users\user\AppData\Roaming\google-oauthlib-tool\credentials.json
- 用文本编辑器打开
credentials.json。请保持该文件打开,因为你需要从中复制多个值。 - 在 Home Assistant 的文件编辑器中(通常是 http://homeassistant.local:8123/core_configurator),打开
/homeassistant/.storage/application_credentials。
- 找到
google_assistant_sdk对应条目,并将client_id和client_secret修改为credentials.json中的值。 - 保存文件。
- 打开
/homeassistant/.storage/core.config_entries。
- 找到
google_assistant_sdk对应条目,并将refresh_token修改为credentials.json中的值。 - 保存文件。
- 重启 Home Assistant。
启用个性化结果
- 前往 设置 > 开发者工具 > 操作,发送一个需要个性化结果的查询,例如调用
google_assistant_sdk.send_text_command并设置command: "what is my name"。 - 你的手机上应该会收到一条通知:Allow personal answers Allow Google Assistant to answer your questions about your calendar, trips, and more。
- 不要点按 ALLOW(在你输入设备名称之前,这不会生效)。请改为点按通知文本本身。
- 如果应用没有打开,你需要换到运行 Android 12 的设备上重试。如果你没有这样的设备,可以使用 Android 模拟器。
- 点按 Device Name,输入任意设备名称(例如 Home Assistant),然后点按 OK。
- 只有在设备名称非空后,才能启用 Personal results 旁边的复选框。
故障排除
如果你的凭据有问题,可以在 应用凭据 用户界面中删除它们。
如果命令不起作用,尝试去掉多余的词,例如 “the”。比如用 “play rain sounds on bedroom speaker”,而不是 “play rain sounds on the bedroom speaker”。
如果针对某个特定设备的命令失败(例如将摄像头画面投到 Google TV),你可能需要在该设备本身上启用 “Personal Results”。例如,在 Google TV 或 Chromecast with Google TV 上,这个设置可能位于 Settings > Privacy > Google Assistant > Personal Results。除了在 Google Home 应用中启用之外,这一步也可能是必需的。
如果广播功能不起作用,请确认:扬声器没有处于免打扰模式,并且 Home Assistant 服务器与扬声器位于同一网络中。
检查集成是否正常工作的最简单方式,是前往 My Google Activity 查看已发送的命令及其响应。
限制与已知问题
- 不支持多个 Google 账户。
- 如果你能在 My Google Activity 中看到已发送的命令,说明集成本身工作正常。如果命令没有产生预期结果,请不要在 Home Assistant Core 项目或其底层库中提交 issue。你应当直接向 Google 这里 报告问题。以下是一些已知的 Google Assistant API 问题:
- Media playback commands (other than play news, play podcast, play white noise, or play rain sounds) don't work.
- Routines don't work.
- Google Assistant automations that use
assistant.event.OkGoogleas a starter cannot be triggered. - Broadcast to specific rooms often doesn't work for non-English languages.
- Commands that need to verify your identity through voice match do not work.
配置
在配置页面中,你可以设置与 Google Assistant 交互时使用的语言代码。如果未配置,集成会根据 Home Assistant 当前设置的语言和国家自动选择。支持的语言列表请参见这里。
操作
发送文本指令
你可以使用 google_assistant_sdk.send_text_command 操作向 Google Assistant 发送命令。
示例:
注意:要控制特定设备,比如将摄像头画面投到电视上,你必须在文本 command 中包含该设备的名称(以 Google Assistant 识别的名称为准)。media_player 参数仅用于播放 Google Assistant 的语音响应,不会决定视频流的目标设备。
你可以在同一会话上下文中发送多条命令,这对于解锁门锁或打开需要 PIN 码的遮阳帘等场景很有用。示例:
你还可以获取响应。示例:
返回结果:
操作:广播消息
notify.google_assistant_sdk 操作允许你向 Google Assistant 扬声器和显示设备广播消息,而不会打断音乐或视频播放。
向所有扬声器广播的示例:
向指定房间中的扬声器广播的示例:
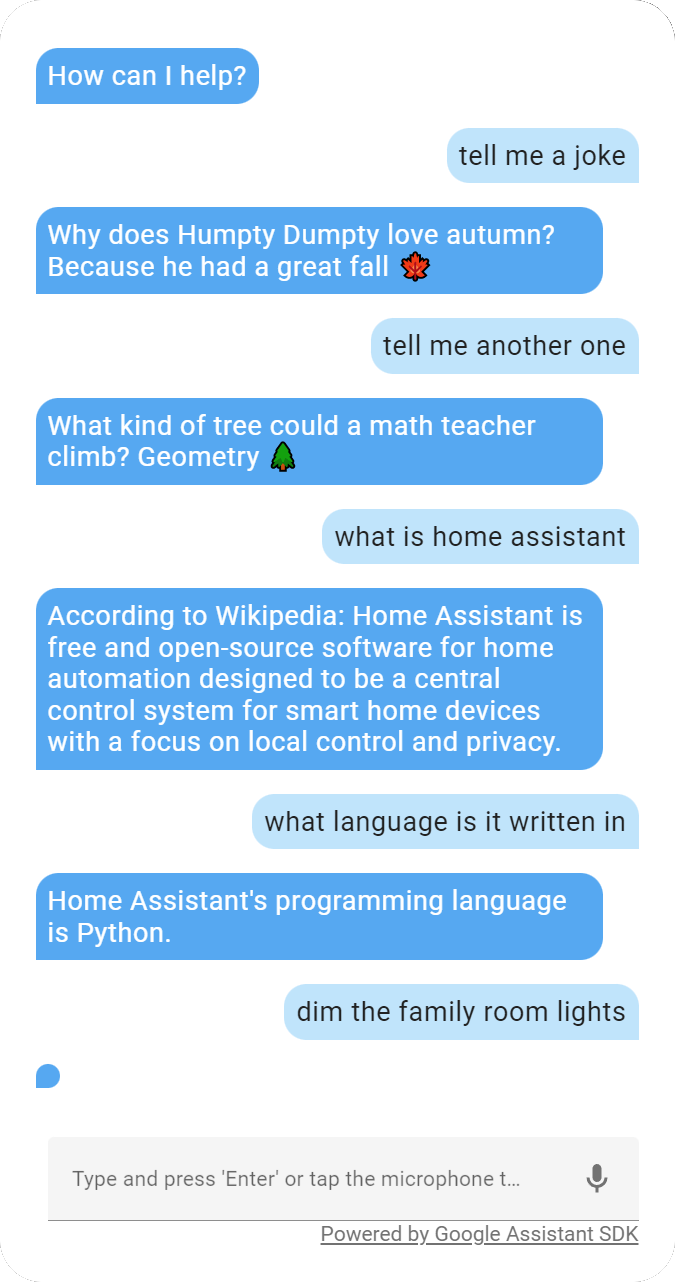
对话代理
你可以添加一个助手,并将对话代理设置为 “Google Assistant SDK”。 相关设置说明请参见这里的 assistant 设置部分。 然后,你就可以通过点按仪表板右上角的 Assist 图标来与 Google Assistant 对话:
或者通过调用 conversation.process 操作。
注意:由于 Google Assistant API 的一个问题,并非所有响应都包含文本,尤其是像“打开灯”这样的家庭控制命令。这类情况会显示为 <empty response>。这是因为 Google Assistant 返回的是 HTML,而 Home Assistant 集成不允许解析 HTML。
删除集成
从 Home Assistant 中删除集成实例
- 前往 设置 > 设备与服务 并选择该集成卡片。
- 在设备列表中,选择你要删除的集成实例。
- 在该条目旁选择三点
菜单,然后选择 删除。