Report the temperature with ESP8266 to MQTT

{::options coderay_line_numbers="table" /}

我最近接触了 ESP8266,这是一颗仅需 5 美元、内置 WiFi 且兼容 Arduino 的芯片。这意味着你现在可以用更低成本完成各种 DIY 项目。

在这篇教程中,我会带你一步步上手 ESP8266,读取温度和湿度数据,并上报到 MQTT,让 Home Assistant 可以接收这些数据。

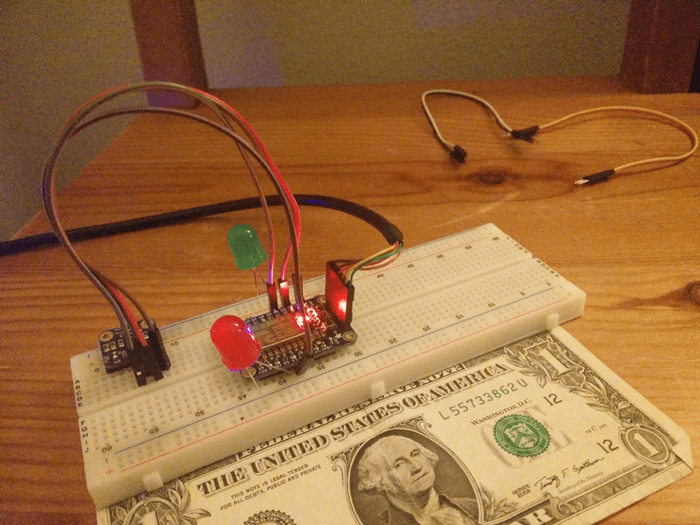
最终搭建效果图(额外加了 2 个 LED 做装饰)

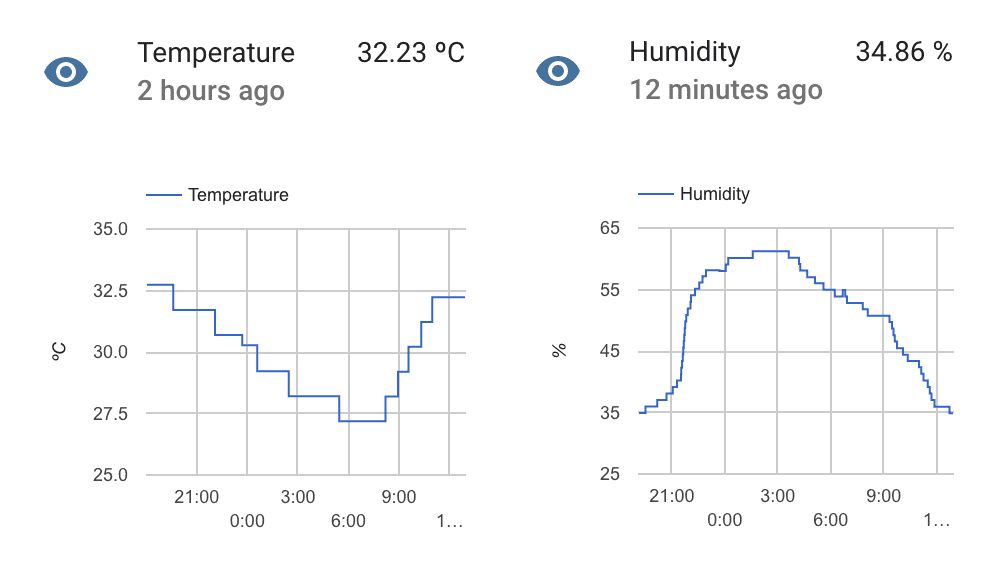
Home Assistant 会记录历史数值,并允许你将其用于自动化。

Components

我这次使用的是 Adafruit 的配件:

除此之外,你还需要常见的硬件原型工具:面包板、若干导线、电烙铁和焊锡丝、串口 USB 线。

Alternatives

这篇文章发布后,HDC1008 已停产。你可以使用下面这些替代方案以及更新后的示例代码:

Connections

在面包板上,将 ESP8266 与 HDC1008 按如下方式连接:

ESP8266HDC1008
GNDGND
3VVin
14SCL
#2SDA

我这里使用的是 #214,你也可以在示例代码中自行配置。

Preparing your IDE

按照这些说明安装并准备 Arduino IDE,以便进行 ESP8266 开发。

安装完成后,打开 Arduino IDE,在菜单中选择 sketch -> include library -> manage libraries,安装以下库:

  • PubSubClient by Nick 'O Leary
  • Adafruit HDC1000

Sketch

完成上面的步骤后,你就可以开始了。

  • 打开 Arduino IDE 并新建一个 sketch(File -> New
  • 将下面的 sketch 复制粘贴到 Arduino IDE
  • 调整第 6 到 14 行的参数,使其符合你的设置
  • 可选:如果你要连接不需要用户名或密码的 MQTT 服务器,请调整第 62 行
  • 为了让 ESP8266 接收新 sketch,需要进入上传模式。在 ESP8266 设备上按住 GPIO0 按钮,同时按下 reset 按钮。红色 LED 会半亮,表示已进入上传模式
  • 在 Arduino IDE 中按下上传按钮
  • 打开串口监视器(Tools -> Serial Monitor)查看设备输出

这个 sketch 会连接到你的 WiFi 网络和 MQTT broker。它每秒读取一次传感器的温度与湿度数据;当与上次上报值的差值大于 1 时,就会发送到 MQTT 服务器。发送到 MQTT broker 的消息会将 retain 设为 True,这意味着任何订阅该 MQTT 主题的客户端都会自动收到最近一次上报的数据。

#include <ESP8266WiFi.h>
#include <Wire.h>
#include <PubSubClient.h>
#include <Adafruit_HDC1000.h>

#define wifi_ssid "YOUR WIFI SSID"
#define wifi_password "WIFI PASSWORD"

#define mqtt_server "YOUR_MQTT_SERVER_HOST"
#define mqtt_user "your_username"
#define mqtt_password "your_password"

#define humidity_topic "sensor/humidity"
#define temperature_topic "sensor/temperature"

WiFiClient espClient;
PubSubClient client(espClient);
Adafruit_HDC1000 hdc = Adafruit_HDC1000();

void setup() {
  Serial.begin(115200);
  setup_wifi();
  client.setServer(mqtt_server, 1883);

  // Set SDA and SDL ports
  Wire.begin(2, 14);

  // Start sensor
  if (!hdc.begin()) {
    Serial.println("Couldn't find sensor!");
    while (1);
  }
}

void setup_wifi() {
  delay(10);
  // We start by connecting to a WiFi network
  Serial.println();
  Serial.print("Connecting to ");
  Serial.println(wifi_ssid);

  WiFi.begin(wifi_ssid, wifi_password);

  while (WiFi.status() != WL_CONNECTED) {
    delay(500);
    Serial.print(".");
  }

  Serial.println("");
  Serial.println("WiFi connected");
  Serial.println("IP address: ");
  Serial.println(WiFi.localIP());
}

void reconnect() {
  // Loop until we're reconnected
  while (!client.connected()) {
    Serial.print("Attempting MQTT connection...");
    // Attempt to connect
    // If you do not want to use a username and password, change next line to
    // if (client.connect("ESP8266Client")) {
    if (client.connect("ESP8266Client", mqtt_user, mqtt_password)) {
      Serial.println("connected");
    } else {
      Serial.print("failed, rc=");
      Serial.print(client.state());
      Serial.println(" try again in 5 seconds");
      // Wait 5 seconds before retrying
      delay(5000);
    }
  }
}

bool checkBound(float newValue, float prevValue, float maxDiff) {
  return !isnan(newValue) &&
         (newValue < prevValue - maxDiff || newValue > prevValue + maxDiff);
}

long lastMsg = 0;
float temp = 0.0;
float hum = 0.0;
float diff = 1.0;

void loop() {
  if (!client.connected()) {
    reconnect();
  }
  client.loop();

  long now = millis();
  if (now - lastMsg > 1000) {
    lastMsg = now;

    float newTemp = hdc.readTemperature();
    float newHum = hdc.readHumidity();

    if (checkBound(newTemp, temp, diff)) {
      temp = newTemp;
      Serial.print("New temperature:");
      Serial.println(String(temp).c_str());
      client.publish(temperature_topic, String(temp).c_str(), true);
    }

    if (checkBound(newHum, hum, diff)) {
      hum = newHum;
      Serial.print("New humidity:");
      Serial.println(String(hum).c_str());
      client.publish(humidity_topic, String(hum).c_str(), true);
    }
  }
}

Configuring Home Assistant

最后一步是把传感器数值接入 Home Assistant。你只需要让 Home Assistant 连接到 MQTT broker,并订阅对应的传感器主题。

mqtt:
  broker: YOUR_MQTT_SERVER_HOST
  username: your_username
  password: your_password

sensor:
  platform: mqtt
  name: "Temperature"
  state_topic: "sensor/temperature"
  qos: 0
  unit_of_measurement: "ºC"

sensor 2:
  platform: mqtt
  name: "Humidity"
  state_topic: "sensor/humidity"
  qos: 0
  unit_of_measurement: "%"