

Tado
Tado 集成平台用作与 my.tado.com 网站交互的接口。
Home Assistant 目前支持以下设备类型:
- Binary sensor - 提供区域的附加信息。
- Climate - 为每个 Tado 区域提供气候实体。
- Water heater - 为热水区域提供热水器实体。
- Presence detection
- Sensor - 提供区域的附加信息。
- Weather - 提供 Tado 家庭所在地的当前天气信息。
- Switch - 用于控制受支持设备上的童锁。
Tado 恒温器是联网恒温器。my.tado.com 上存在一个非官方 API,该 API 被其网站使用,现在也被此组件使用。
目前它支持显示当前温度、设定温度和当前运行模式。运行模式可设置为手动、自动和关闭。如果家中没有用户在家,所有 Tado 区域都会显示 away 状态(仅适用于 Tado assist 模式)。同时也支持手动在 home-mode 与 away-mode 之间切换。手动切换到 auto-mode 仅在 Tado assist 模式下受支持。任何 Tado climate 卡片都可在这些在家状态模式之间切换,这会影响整个家庭的设置。
此集成可通过 UI 配置。前往 设置 > 设备与服务 添加。
连接 Tado
自 2025 年 3 月 21 日 起,Tado 更改了认证方式。这意味着登录时需要额外执行几个步骤:
- 设置此集成时,集成会生成一个
Device Code,并提供一个指向 Tado 认证服务器的 URL。 - 打开该 URL 并确认
Device Code(通常会自动复制)。 - 按照步骤登录并验证您的账户。
- 完成认证后,回到 Home Assistant,等待几秒钟让加载界面完成。此时您就已连接到 Tado!
自 2026 年 1 月 1 日 起,Tado 对 API 实施了严格的速率限制。限制基于每日配额,并且会因订阅类型不同而异。如果受到影响,Tado 集成可能无法完成认证和/或无法接收新数据,从而导致集成无法正常工作。重置时间为 CET 12:00。
建议根据需要使用自定义轮询间隔。
迁移到新的认证方式
默认情况下,集成会检测是否需要针对新的登录方式重新认证,并提示执行重新认证操作。请按照 Connect with Tado 中的步骤操作。
不支持的设备类型
新的 Tado X 设备不受此集成支持,必须通过 Matter integration 使用。
在家检测
Tado 设备追踪器使用 Tado Smart Thermostat 基于智能手机地理围栏的位置在家检测功能。
该追踪器使用 Tado API 来判断移动设备是否在家。
默认情况下,Tado 设备追踪器会追踪所有与您家庭关联、且被 Tado 识别的设备。要被追踪,设备上的 Tado 应用必须启用 Geolocation 权限。
您的设备至少要有一次处于在家状态,之后才会显示为 home 或 away。 针对在家信息的 Tado API 轮询最多每 30 秒进行一次。
请注意,Tado(v2)API 不提供设备的 GPS 位置,只提供方向信息,因此 Home Assistant 仅使用 home/not-home 状态。
数据更新
此集成通常每五分钟更新一次。若要了解如何定义自定义轮询间隔,请参考下面的步骤。
定义自定义轮询间隔
If you want to define a specific interval at which your device is polled for data, you can disable the default polling interval and create your own polling automation.
- Go to Settings > Devices & services, and select your integration.
- On the integration entry, select
. - Then, select System options and toggle the button to disable polling.
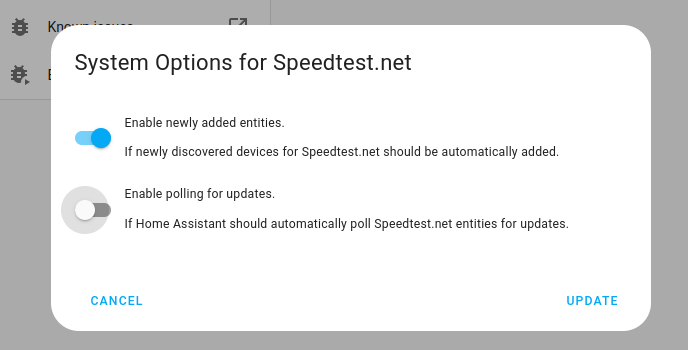
- Then, select System options and toggle the button to disable polling.
- To define your custom polling interval, create an automation.
- Go to Settings > Automations & scenes and create a new automation.
- Define any trigger and condition you like.
- Select Add action, then select Other actions.
- Select Perform action, and from the list, select the
homeassistant.update_entityaction. - Choose your targets by selecting the Choose area, Choose device, Choose entity, or Choose label buttons.
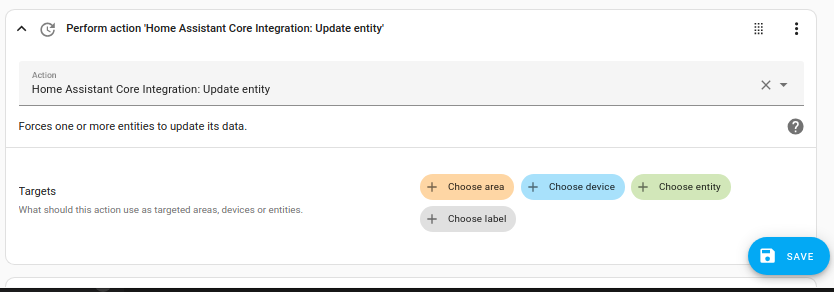
- Save your new automation to poll for data.
操作
操作:设置气候计时器
tado.set_climate_timer 操作用于让您的 Tado 气候设备(例如暖气阀)在设定时间段内开启。
操作:设置热水器计时器
tado.set_water_heater_timer 操作用于让热水器在设定时间段内开启。
操作:设置气候温度偏移
tado.set_climate_temperature_offset 操作用于为 Tado 气候设备设置温度偏移。
示例:
操作:添加表计读数
tado.add_meter_reading 操作用于将表计读数添加到 Tado Energy IQ。借助 Energy IQ,您可以跟踪能耗并更好地控制供暖支出。
示例: