

MTA New York City Transit
The MTA New York City Transit integration provides real-time subway and bus arrival predictions for NYC transit lines using GTFS-RT data from the Metropolitan Transportation Authority (MTA).
Prerequisites
- Subway tracking: No API key is required.
- Bus tracking: An MTA Bus Time API key is required.
此集成可通过 UI 配置。前往 设置 > 设备与服务 添加。
Adding a subway stop
To add a subway arrival sensor:
- Go to Settings > Devices & services and select the MTA New York City Transit integration.
- Select Add subway stop.
- Select the subway line you want to monitor from the dropdown.
- Select the stop and direction (indicated by N/S suffix for northbound/southbound).
Adding a bus stop
To add a bus arrival sensor:
- Go to Settings > Devices & services and select the MTA New York City Transit integration.
- Select Add bus stop.
- Enter the bus route (for example,
M15,B46,Q10). - Select the stop from the list. Direction information is included with each stop.
Bus tracking requires an API key. If you did not provide one during initial setup, you will be prompted to enter one when you attempt to add a bus stop.
Supported functionality
The integration creates a device per stop with 9 sensors, covering the next 3 upcoming arrivals.
Sensors
For each of the next 3 arrivals, the following sensors are created:
- Arrival: A timestamp sensor showing the predicted arrival time.
- Arrival destination: The final destination of the train or bus.
- Arrival route: The route identifier of the train or bus.
Defining a custom polling interval
If you want to define a specific interval at which your device is polled for data, you can disable the default polling interval and create your own polling automation.
- Go to Settings > Devices & services, and select your integration.
- On the integration entry, select
. - Then, select System options and toggle the button to disable polling.
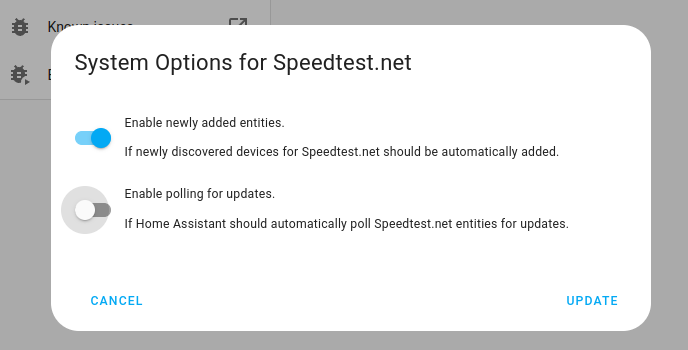
- Then, select System options and toggle the button to disable polling.
- To define your custom polling interval, create an automation.
- Go to Settings > Automations & scenes and create a new automation.
- Define any trigger and condition you like.
- Select Add action, then select Other actions.
- Select Perform action, and from the list, select the
homeassistant.update_entityaction. - Choose your targets by selecting the Choose area, Choose device, Choose entity, or Choose label buttons.
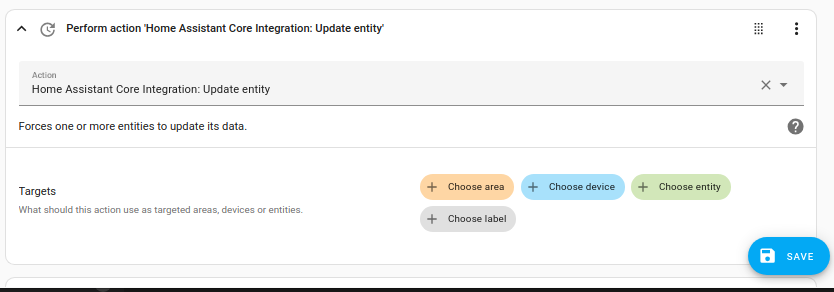
- Save your new automation to poll for data.
The default polling interval is 30 seconds.
Removing the integration
This integration follows standard integration removal. No extra steps are required.
To remove an integration instance from Home Assistant
- Go to Settings > Devices & services and select the integration card.
- From the list of devices, select the integration instance you want to remove.
- Next to the entry, select the three-dot
menu. Then, select Delete.