

Model Context Protocol Server
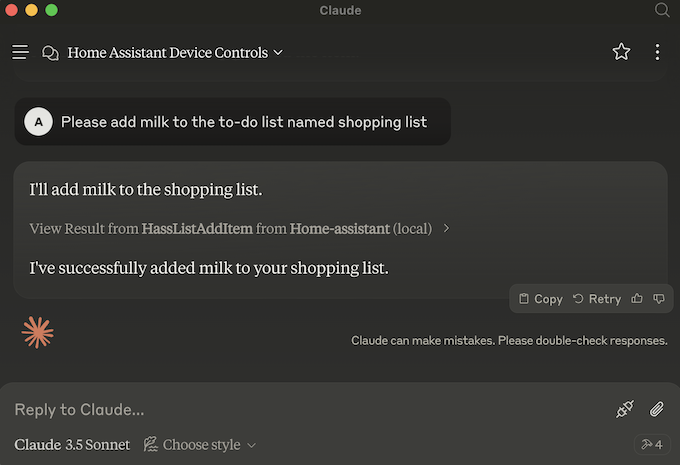
Model Context Protocol 是一种开放协议,用于标准化应用程序向 LLMs 提供上下文的方式。Model Context Protocol Server(MCP)集成让你可以使用 Home Assistant 为 MCP LLM 客户端应用提供上下文。例如,你可以从 Claude Desktop 控制家中的灯,或将你的 Google Tasks 待办清单作为工具公开。
要控制 Home Assistant,需要向 MCP 客户端提供 Home Assistant 的 Assist API 访问权限。你可以在 公开实体页面 中控制它可访问的设备和实体。
先决条件
- 你需要一个 MCP 客户端 LLM 应用,例如 Claude for Desktop。
- 如果你的客户端不支持远程服务器,则还需要额外的本地 MCP 服务器远程网关。
有关详细配置说明,请参阅客户端配置部分。
此集成可通过 UI 配置。前往 设置 > 设备与服务 添加。
配置选项
此集成提供以下配置选项:
架构概览
此集成可提供与其他基于 LLM 的对话代理类似的功能,例如 Anthropic、Google Generative AI、Ollama 和 Open AI。在这些对话代理中,Home Assistant 是客户端,会准备可用工具并通过提示词将其传递给 LLM。
Model Context Protocol 采用不同的模式:LLM 应用充当客户端,并可连接到多个 MCP 服务器来提供上下文。有关更多详细信息,请参阅 Model Context Protocol 简介。
Home Assistant Model Context Protocol Server 集成实现了 Streamable HTTP 协议,允许客户端与服务器通过无状态协议通信。有些 MCP 客户端只支持 stdio 传输,并会将 MCP 服务器作为本地命令行工具直接运行。你可以使用像 mcp-proxy 这样的 MCP 代理服务器,作为访问 Home Assistant MCP SSE 服务器的网关。
Client configuration
Model Context Protocol 规范最近定义了授权和连接远程服务器的标准。这些标准仍在持续发展中,因此某些客户端可能还不支持最新功能,规范本身也很可能会继续演进。
Home Assistant MCP 服务器通过 /api/mcp 提供访问,并要求客户端提供身份验证令牌。
访问控制
OAuth
Model Context Protocol 支持使用 OAuth 进行授权,并且 Home Assistant 的身份验证 API已完整支持。支持 OAuth 的 MCP 客户端可以借此获得你授予的 Home Assistant MCP 服务器访问权限。
Home Assistant 采用了 IndieAuth,因此不需要你预先定义 OAuth Client ID。相反,Client ID 就是重定向 URL 的基础地址。
- Client ID:如果你的 redirect-uri 是
https://www.example.com/mcp/redirect,那么你的 client ID 应为https://www.example.com。 - Client Secret:Home Assistant 不使用此值,因此可以忽略或随意填写。
长期访问令牌
某些 MCP 客户端可能不支持 OAuth,但支持访问令牌。你可以创建一个长期访问令牌,以允许客户端访问 API。
-
打开你的账户个人资料设置,在 Security 选项卡下进行操作。
 。
。 -
创建一个 Long-lived access token
-
复制该访问令牌,并在配置 MCP 客户端 LLM 应用时使用。
有关 Home Assistant 身份验证的更多信息,请参阅身份验证文档。
示例:Claude for Desktop
Claude for Desktop 现已支持远程 MCP 服务器,因此可以非常轻松地连接到你的 Home Assistant 实例:
-
下载 Claude for Desktop 并登录。
-
选择你的个人资料名称,选择 Settings,然后进入 Connectors。
-
选择 Add Custom Connector。
-
输入以下信息:
- Name:
Home Assistant(或你喜欢的更具描述性的名称) - Remote MCP Server URL:
https://<your_home_assistant_url>/api/mcp - 在高级设置中:
- OAuth Client ID:
https://claude.ai - OAuth Client Secret:留空
- OAuth Client ID:
- Name:
-
选择 OK。然后在你刚刚创建的条目旁选择 Connect。
-
登录你的 Home Assistant 实例,并允许重定向返回 Claude Desktop。
-
现在你可以在与 Claude 对话时启用来自 Home Assistant 的工具,以类似语音助手的方式控制 Home Assistant。Claude 会在调用任何工具前征求你的许可。
示例:Claude Code
Claude Code 支持远程 MCP 服务器,因此可以轻松连接到你的 Home Assistant 实例:
-
安装 Claude Code 并登录。
-
在 shell 中运行以下命令:
名称
HA、URLhttps://<your_home_assistant_url>和回调端口12345都只是示例;请根据你的实际环境进行调整。 -
启动
claude并输入/mcp。导航到你的 MCP 列表项(例如 HA)并按 Enter。选择 Authenticate,在浏览器中打开 Home Assistant 登录页面。 -
完成 Home Assistant 服务器身份验证后,Home Assistant 会提示你可以关闭浏览器。
-
现在你可以在与 Claude 对话时启用来自 Home Assistant 的工具,以类似语音助手的方式控制 Home Assistant。Claude 会在调用任何工具前征求你的许可。
示例:Cursor
- 下载并安装 Cursor。
- 按照 README 中的说明安装
mcp-proxy。 例如:uv tool install git+https://github.com/sparfenyuk/mcp-proxy。 - 打开 Cursor 主设置并选择 MCP。
- 选择 Add new global MCP server,然后添加 Home Assistant 服务器配置:
- 保存你的
mcp.json文件。你也可以在$HOME/.cursor/mcp.json目录中找到该文件。 - 重启 Cursor 并返回 MCP 设置。你应该能在列表中看到 Home Assistant 服务器,指示器应为绿色。
- 在聊天代理模式(Ctrl+I)中,让它控制你的家居,随后应会调用该工具。
示例:gemini-cli
-
如果你尚未安装
gemini-cli,请先安装。安装说明见 https://geminicli.com/。 -
打开
gemini-cli配置文件,通常位于~/.gemini/settings.json。更多信息请参阅 gemini-cli MCP server documentation。 -
将以下内容添加到你的
mcpServers配置中: -
将
<your_home_assistant_url>替换为你的 Home Assistant 实例 URL。 -
将
HOMEASSISTANT_TOKEN环境变量设置为来自你 Home Assistant 实例的长期访问令牌。 -
保存文件。现在你就可以在
gemini-cli中使用 Home Assistant 工具了。
支持的功能
工具
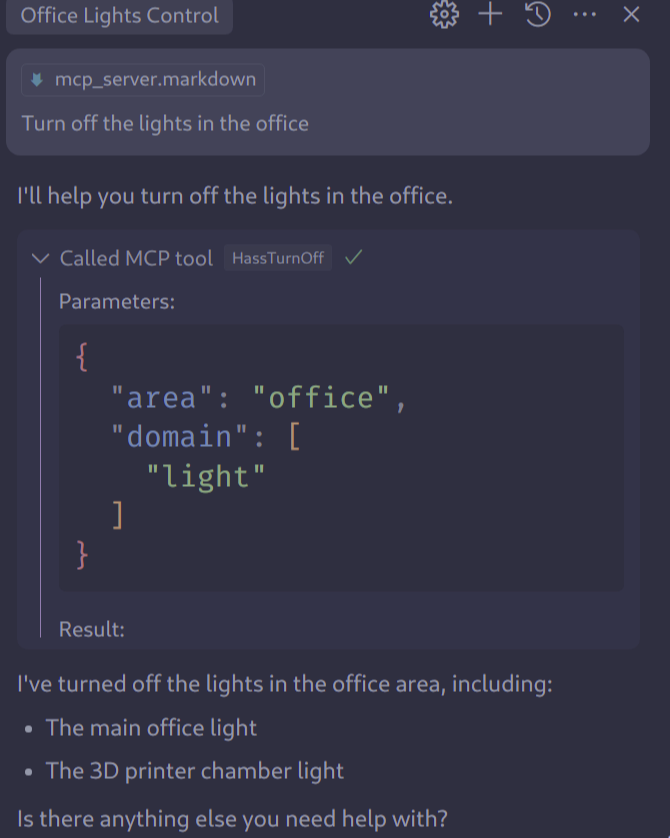
MCP Tools 让 LLM 能够通过 Home Assistant 执行动作。已配置的 LLM API 所使用的工具会被公开。
提示词
提供的 MCP Prompts 会告诉 LLM 如何调用这些工具。已配置的 LLM API 所使用的工具会被公开。
已知限制
Home Assistant Model Context Protocol 集成目前仅支持部分 MCP 功能:
故障排除
由于 Claude for Desktop 是主要客户端,本节提供了针对它的故障排除信息。另请参阅 Debugging in Claude Desktop。
LLM 客户端无法连接到 Home Assistant MCP 服务器
症状:Failed to start MCP server: Could not start MCP server Home Assistant
当你尝试将 Claude for Desktop 之类的客户端配置为连接 Home Assistant 时,应用会显示类似 “Failed to start MCP server: Could not start MCP server Home Assistant” 的消息。
说明
这表示本地 MCP 服务器 mcp-proxy 无法启动。
解决方法
请确认 claude_desktop_config.json 中的命令行参数是否正确。你也可以尝试手动运行该命令,以确认系统能够找到它。
症状:“MCP server Home Assistant disconnected” 或 “Could not attach to MCP server Home Assistant”
当你尝试将 Claude Desktop 之类的客户端配置为连接 Home Assistant 时,应用会显示类似 “MCP server Home Assistant disconnected” 或 “Could not attach to MCP server Home Assistant” 的消息。
说明
这表示 MCP 服务器已经启动,但它在与 Home Assistant 通信时遇到了问题,或者 Home Assistant 中的 MCP 服务器尚未配置。
解决方法
要了解根本原因,请先检查客户端中的调试日志。以 Claude for Desktop 为例:
- 打开 Settings...。
- 选择 Developer。
- 选择
Home AssistantMCP 服务器。 - 选择 Open Logs Folder。
- 查看
mcp-server-Home Assistant.log。以下是已知问题及其解决方法:Client error '404 Not Found' for url 'http://localhost:8123/api/mcp':这表示 Home Assistant 中尚未配置 MCP Server 集成。Client error '401 Unauthorized' for url 'http://localhost:8123/api/mcp':这表示长期访问令牌不正确。 ...
移除集成
你可以按照以下步骤移除此集成:
To remove an integration instance from Home Assistant
- Go to Settings > Devices & services and select the integration card.
- From the list of devices, select the integration instance you want to remove.
- Next to the entry, select the three-dot
menu. Then, select Delete.