

Google Maps Travel Time
Google Maps Travel Time 集成通过 Google Maps Routes API 提供行程时间。
设置
您需要按照此处的说明注册一个 API 密钥。您只需要启用 Routes API。
Google 要求启用计费功能(并绑定有效信用卡)后才能访问 Google Maps API。Routes API 当前每月提供 10,000 次免费请求,并会考虑当前交通状况。该传感器每 10 分钟更新一次行程时间,每天大约发起 144 次调用。请注意,按这个频率计算,使用超过 2 个传感器可能会超出免费额度。由于默认更新频率无法降低,如果您需要更灵活的数据更新方式,可考虑按需触发更新(参见下方自动化示例)。
您可以为 API 设置配额,以避免超出免费额度。请将 Elements per day 设为 322 或更低。有关如何配置配额的详细信息,请参阅这里。
此集成可通过 UI 配置。前往 设置 > 设备与服务 添加。
说明:
- Origin 和 Destination 可以是地址或位置的 GPS 坐标(GPS 坐标必须以逗号分隔)。您也可以输入在状态中提供此信息的实体 ID、带有纬度和经度属性的实体 ID,或区域友好名称(区分大小写)。
操作
此集成提供以下操作。
操作:获取行程时间
google_travel_time.get_travel_times 操作用于获取两个位置之间的备选路线和行程时间。它会填充响应数据。
- Data attribute:
config_entry_id- Description: 此操作要使用的配置条目。
- Optional: No
- Data attribute:
origin- Description: 路线的起点。您可以使用地址、GPS 坐标或实体 ID。
- Optional: No
- Data attribute:
destination- Description: 路线的终点。您可以使用地址、GPS 坐标或实体 ID。
- Optional: No
- Data attribute:
mode- Description: 交通方式。可用选项:
driving、walking、bicycling。 - Optional: Yes
- Description: 交通方式。可用选项:
- Data attribute:
units- Description: 使用哪种单位制。可用选项:
metric、imperial。 - Optional: Yes
- Description: 使用哪种单位制。可用选项:
- Data attribute:
language- Description: 响应所使用的语言。
- Optional: Yes
- Data attribute:
avoid- Description: 计算路线时要避开的要素。可用选项:
tolls、highways、ferries、indoor。 - Optional: Yes
- Description: 计算路线时要避开的要素。可用选项:
- Data attribute:
traffic_model- Description: 计算驾车路线时使用的交通模型。可用选项:
best_guess、pessimistic、optimistic。 - Optional: Yes
- Description: 计算驾车路线时使用的交通模型。可用选项:
- Data attribute:
departure_time- Description: 期望的出发时间,格式为时间字符串,例如
08:00:00。 - Optional: Yes
- Description: 期望的出发时间,格式为时间字符串,例如
操作:获取公共交通行程时间
google_travel_time.get_transit_times 操作用于获取两个位置之间使用公共交通的备选路线和行程时间。它会填充响应数据。
- Data attribute:
config_entry_id- Description: 此操作要使用的配置条目。
- Optional: No
- Data attribute:
origin- Description: 路线的起点。您可以使用地址、GPS 坐标或实体 ID。
- Optional: No
- Data attribute:
destination- Description: 路线的终点。您可以使用地址、GPS 坐标或实体 ID。
- Optional: No
- Data attribute:
units- Description: 使用哪种单位制。可用选项:
metric、imperial。 - Optional: Yes
- Description: 使用哪种单位制。可用选项:
- Data attribute:
language- Description: 响应所使用的语言。
- Optional: Yes
- Data attribute:
transit_mode- Description: 首选公共交通方式。可用选项:
bus、subway、train、tram、rail。 - Optional: Yes
- Description: 首选公共交通方式。可用选项:
- Data attribute:
transit_routing_preference- Description: 公共交通路线偏好。可用选项:
less_walking、fewer_transfers。 - Optional: Yes
- Description: 公共交通路线偏好。可用选项:
- Data attribute:
departure_time- Description: 期望的出发时间,格式为时间字符串,例如
08:00:00。 - Optional: Yes
- Description: 期望的出发时间,格式为时间字符串,例如
- Data attribute:
arrival_time- Description: 期望的到达时间,格式为时间字符串,例如
08:00:00。 - Optional: Yes
- Description: 期望的到达时间,格式为时间字符串,例如
您只能使用 departure_time 或 arrival_time 其中之一,不能同时使用两者。
动态配置
可将跟踪配置为跟踪 device_tracker、zone、sensor 和 person 类型的实体。如果在 Origin 或 Destination 中填写实体,则平台每 5 分钟更新时都会使用该实体的最新位置。
示例
从实体跟踪到实体
Origin: device_tracker.mobile_phone Destination: zone.home
从实体跟踪到区域友好名称(例如 “Eddies House”)
Origin: zone.home Destination: Eddies House
实体跟踪
- device_tracker
- 如果状态是某个区域,则使用该区域的位置
- 如果状态不是区域,则查找其 longitude 和 latitude 属性
- zone
- 使用 longitude 和 latitude 属性
- 也可以直接通过属性中的区域友好名称来引用
- sensor
- 如果状态是区域或区域友好名称,则使用该区域的位置
- 其他所有状态都会直接传给 Google API
- 这包括 Configuration Variables 中列出的所有有效位置
使用自动化按需更新传感器
使用自动轮询可能导致调用次数超出 API 限额,特别是在您使用同一个 API 密钥跟踪多个行程时间时。若要使用更细粒度的轮询方式,请禁用自动轮询。
您可以使用 homeassistant.update_entity 操作按需更新传感器。例如,如果您希望在工作日早晨每 2 分钟更新一次 sensor.morning_commute,可以使用以下自动化:
有关如何定义自定义轮询间隔的更详细步骤,请按照以下流程操作。
定义自定义轮询间隔
If you want to define a specific interval at which your device is polled for data, you can disable the default polling interval and create your own polling automation.
- Go to Settings > Devices & services, and select your integration.
- On the integration entry, select
. - Then, select System options and toggle the button to disable polling.
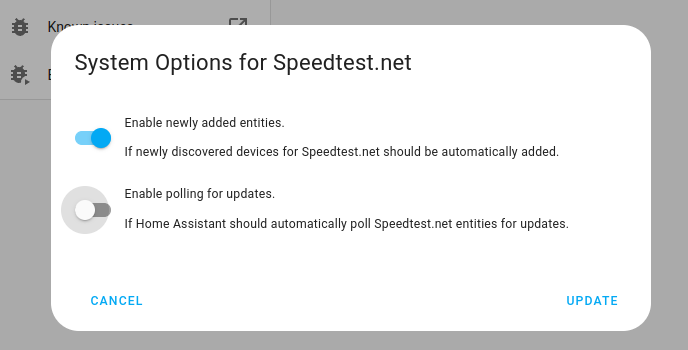
- Then, select System options and toggle the button to disable polling.
- To define your custom polling interval, create an automation.
- Go to Settings > Automations & scenes and create a new automation.
- Define any trigger and condition you like.
- Select Add action, then select Other actions.
- Select Perform action, and from the list, select the
homeassistant.update_entityaction. - Choose your targets by selecting the Choose area, Choose device, Choose entity, or Choose label buttons.
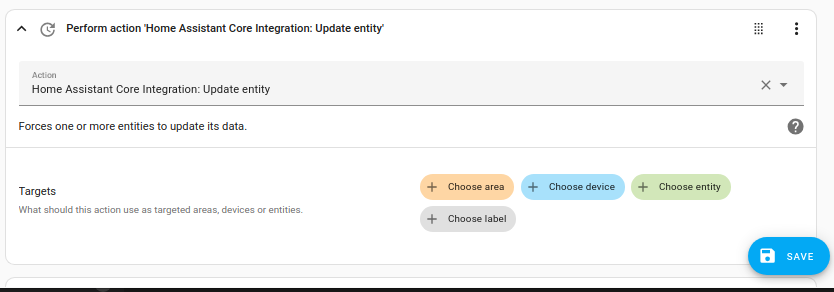
- Save your new automation to poll for data.