

Ubiquiti airOS
Ubiquiti UISP 系列的无线产品提供了一套专为互联各种位置而设计的综合设备。只要这些 airOS 设备可以在没有(或有限)建筑物或树木等障碍物的情况下"看到"彼此,就可以建立稳定且高带宽的"波束"。即使是最具成本效益的设备也可以实现高达 450 Mbps 的真实 TCP/IP 吞吐量,并保持可靠连接达 10 公里范围。
一个常见的用例是在建筑物、远程站点、邻居甚至您的棚屋之间建立无线PtP 或PtMP 链路。当传统光纤或铜缆网络布线不切实际或距离对铜缆布线太远时,这非常有优势。在 airOS 设备之间具有 LoS 时,可以建立稳定且高带宽的"波束",无需任何额外基础设施。这可以比使用接入点网状网络扩展 WiFi 覆盖有所改进,因为网状网络可能会降低 WiFi 网络的容量和性能。
目前 Home Assistant 支持以下平台:
此集成允许用户将网络指标和状态直接拉取到他们的 Home Assistant 仪表板中,从而在其智能家居生态系统中实现高级自动化、通知和全面的网络监控。
前提条件
此集成支持运行 airOS 6 和 8 的设备,使用来自其本地 API 的数据。
Configuration
To add the Ubiquiti airOS device to your Home Assistant instance, use this My button:

Ubiquiti airOS can be auto-discovered by Home Assistant. If an instance is found, it will be shown as Discovered and can be set up right away.
Manual configuration steps
- Browse to your Home Assistant instance.
- Go to Settings > Devices & services.
- In the lower-right corner, select Add integration.
- From the list, select Ubiquiti airOS.
- Follow the instructions on screen to complete the setup.
支持的设备
虽然运行 airOS 固件版本 6 和 8 的设备没有已知限制,但以下设备已被成功测试。
Do you have a device that works? We'd love to hear your experience 以便我们可以将其添加到列表中!
airOS 固件 6
- NanoStation M5 (NSM5)
- NanoStation M5 loco (LocoM5)
airOS 固件 8
- LiteAP GPS (LAP-GPS)
- LiteBeam 5AC (LBE-5AC-GEN2)
- NanoBeam 5AC (NBE-5AC-Gen2)
- NanoStation 5AC Loco (Loco5AC)
- PowerBeam 5AC: 620 (PBE-5AC-620) 和 Gen2 (PBE-5AC-Gen2)
运行角色
根据设备的放置位置,它将被配置为作为中央设备的"接入点"(AP)或作为客户端连接的"站点"。一个 AP 可以有多个站点连接到它,而一个站点通常只连接到一个 AP。
对于站点,它们可以在"网桥"或"路由器"角色中运行:
-
在"网桥"模式下,默认和最常见的配置
- airOS 设备只是桥接无线和有线连接。简单来说,它的功能就像一根透明的网线,对站点和 AP 两端的设备都是不可见的。
- 此模式非常适合在不引入新子网或管理额外路由的情况下扩展网络覆盖。
-
在"路由器"模式下,airOS 设备
- 充当小型路由器,执行 NAT 以及为其 LAN 端口连接的设备提供 DHCP 服务。
- 也可以配置为 PPPoE 客户端,与中央 PPPoE 服务器进行认证以接收其 IP 地址、网关和其他网络设置。
网桥和路由器模式之间的选择取决于网络架构以及设备是旨在扩展现有网络(网桥)还是创建新子网(路由器)。
按钮
重启
默认禁用,可以启用以提供重启设备的按钮。
传感器
网络角色
指示设备在您网络中的角色,"bridge"(网桥)或"router"(路由器)(有关更多信息,请参阅运行角色)。
无线频率
为此设备设置的基础频率。
无线 SSID
此设备使用的 SSID(即无线网络名称)。
下载容量和上传容量
指示设备之间下载和上传的估计最大链路容量(带宽)。
吞吐量接收和吞吐量发送
这些传感器显示此设备的实际数据传输速率(接收和发送)。
天线增益
设备天线的性能,以 dB 为单位。请参阅维基百科上的增益。
数据更新
数据每 60 秒从设备轮询一次。
示例
检测链路退化
由于两个站点之间需要保持 LoS,距离越远,就越有可能偶尔有东西阻挡路径。建筑工地的起重机可能挡在路中间,或者您当地的窗户清洁工可能稍微碰到了您的接入点,导致其天线错位。虽然链路可能仍在运行,但肯定无法提供之前的容量。此自动化示例将在您的链路容量带宽发生意外变化时通知您。
当您的 NanoStation 报告的下载或上传容量显著低于其预期性能水平时,此自动化将触发。
上面的示例目前考虑了 450 Mbit/s 的 25% 退化。如果您想以动态方式考虑您的实际容量,我们建议查看 Statistics 集成。
故障排除
访问本地设备
如果您需要直接配置设备,可以通过以下方式找到设备的链接:
- 前往 设置 > 设备与服务,并选择您的集成和设备。
- 在设备条目上,选择为配置 URL 提供的链接(通常在
图标旁边找到)。 - 按照设备 Web 界面上的说明操作或查阅 airOS 8 手册 (PDF)。
调整更新间隔
请注意,默认间隔被认为是最佳实践。更新过于频繁可能会给您的网桥带来相当大的负载,导致意外结果或数据丢失。
If you want to define a specific interval at which your device is polled for data, you can disable the default polling interval and create your own polling automation.
- Go to Settings > Devices & services, and select your integration.
- On the integration entry, select
. - Then, select System options and toggle the button to disable polling.
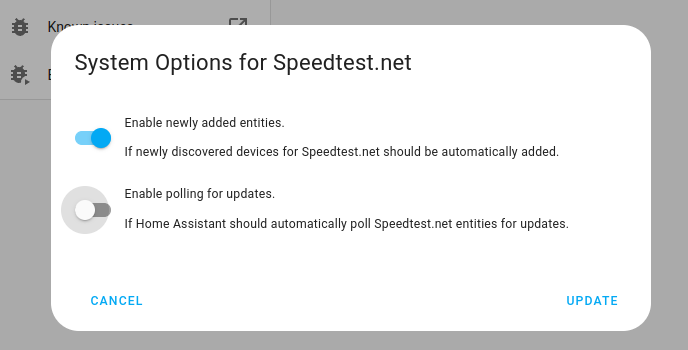
- Then, select System options and toggle the button to disable polling.
- To define your custom polling interval, create an automation.
- Go to Settings > Automations & scenes and create a new automation.
- Define any trigger and condition you like.
- Select Add action, then select Other actions.
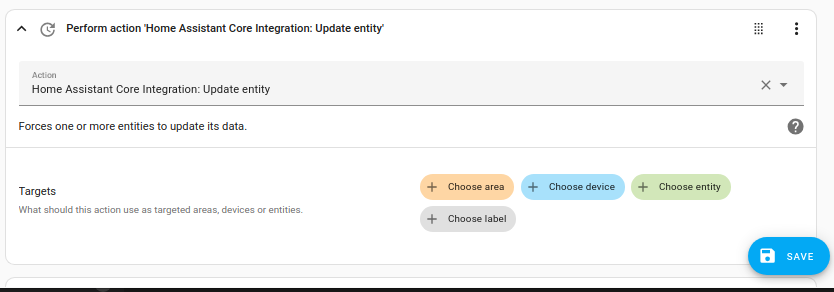
- Select Perform action, and from the list, select the
homeassistant.update_entityaction. - Choose your targets by selecting the Choose area, Choose device, Choose entity, or Choose label buttons.
- Save your new automation to poll for data.
诊断数据
如果您需要创建问题来报告错误或想检查诊断数据,请使用以下方法检索诊断信息:
- 前往 设置 > 设备与服务,并选择您的集成和设备。
- 在集成条目上,选择
。 - 然后,选择 下载诊断信息,将下载一个 JSON 文件。
- 您可以检查下载的文件,或在被要求时将其上传到您的问题报告中。
移除集成
此集成遵循标准集成移除流程。在 Home Assistant 中或运行 airOS 的设备上无需额外步骤。
To remove an integration instance from Home Assistant
- Go to Settings > Devices & services and select the integration card.
- From the list of devices, select the integration instance you want to remove.
- Next to the entry, select the three-dot
menu. Then, select Delete.